
Collaborative reading with Perusall
At a glance
Explore how to use Perusall, a social reading platform integrated into Moodle, to help students collaboratively annotate readings and videos. Find guidance on setting up a Perusall course, creating and linking assignments, understanding automatic grading, and sharing resources with students.
Perusall is a free social reading platform integrated into Moodle which allows students (and teaching staff) to digitally annotate readings and videos collectively (with text, links, and embedded content), and respond to each other’s comments and questions. Perusall motivates participation via social connections and automatic engagement scores. As the instructor, you can engage in the discussion with students, and you also have oversight of the student engagement. You can access a student confusion report — a one-page summary of concepts students had trouble with, or most engaged them, along with some of the best annotations.
Perusall supports a rich and engaging reading experience - if properly used. Perusall can be used in several ways:
- Uploading open sourced and unpublished content in the public domain
- Purchasing articles and resources directly from Perusall
- Using materials by arrangement with the Library/database (for details, contact the Monash Library)
- Share publicly listed videos from YouTube, Vimeo, Google Drive or Dropbox
Before using Perusall, to ensure the resources you are uploading abide by copyright laws please read the Responsible use of Perusall guide.
Note: Although Perusall is integrated into Moodle, it is NOT enterprise supported. Any technical queries must be directed to Perusall.
Set up a Perusall course
Before creating a Perusall actvity, you must first create a Perusall course via Moodle. Once you have set up the Perusall course, you can begin adding resources in Persuall and creating assignments, which will automatically be linked in the Moodle Gradebook.
- Ensure editing is on.
- In the section you would like to add a Perusall link, click Add an activity or resource.
- Select Perusall 1.3 activity and click Add.
- In the General section give your activity a name and a description. This will display as the link on the unit page. You do not need to click the Select Content button.
- Select the relevant options for Monash Assessment, AI statement and Special consideration section.
- Click Save and display.
- Click on the Open in a new window link. This will redirect you to Perusall. Read through the Terms of Service and Privacy Policy before clicking OK.
- Follow the directions in Perusall to set up your course. It is recommended that you add all course content before creating reading assignments.
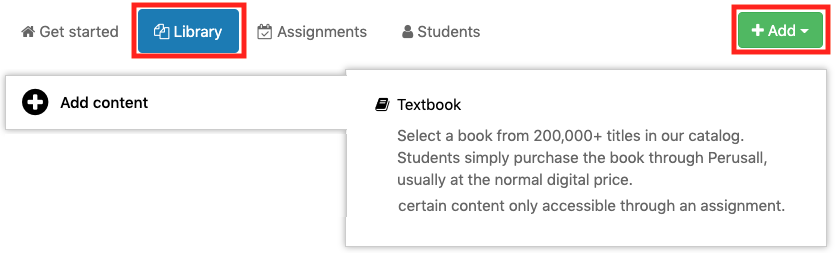
- To add content (documents or video links), click on the Library tab and then click on +Add or select from the list along the right hand side of the page.
- Follow the course set up instructions to complete the settings for course start and end times and grouping preferences.
- Once you have set up a new course in Perusall through Moodle, the student roster in Perusall may appear empty. This is normal as Perusall will automatically populate with students once they launch Perusall from Moodle for the first time.
Note: Each Moodle unit creates a unique Perusall course. Therefore, each semester you will need to set up the Perusall course again. Click on Choose course materials and then Materials from another course to duplicate both materials and settings from the previous semester.
Create an activity in Perusall
Once you have set up the Perusall course in Moodle, you can start adding resources and creating assignments. If you plan to have multiple graded Perusall assignments, you will need to create multiple external tool activities and link each individual Perusall assignment to seperate external tool activities.
In Perusall
- Click the Assignments tab.
- Click Add Assignment.
- Choose content to assign and range to assign.
- Set name and deadline. The name must be identical to the name used within Moodle to link the activity properly.
- Set optional advanced options. Ensure that the amount of annotations required is appropriate for the content.
- Click Save changes.
Adding direct links to each assignment in your Moodle unit
The Perusall 1.3 link will take students directly to the Perusall course where they can see all activities for the unit. To link students to individual assignments, for example a weekly reading, you can use the Moodle URL resource.
- In Perusall, click on the assignment that you would like to link.
- Copy the URL.

- In Moodle, ensure editing is on.
- In the section you would like to add the Perusall assignment link, click Add an activity or resource and select URL.
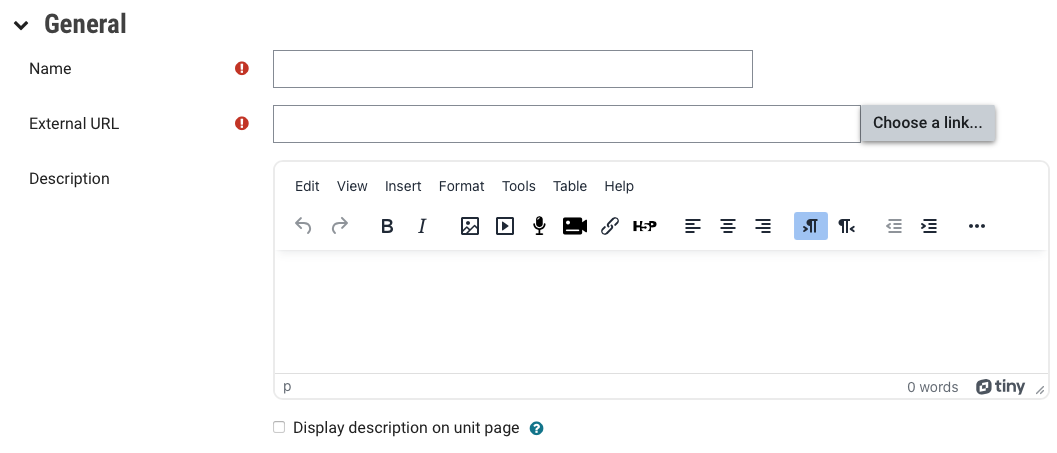
- Enter a name for your URL. This will appear as the clickable link.
Note: You can also add a description that can be read by students. The description can be displayed if you choose ‘Embed’ in the Display option. If you choose any other option, students will only see the description if they right-click on the link and select Open in a new tab or window. - In External URL, paste the Perusall URL that you copied.
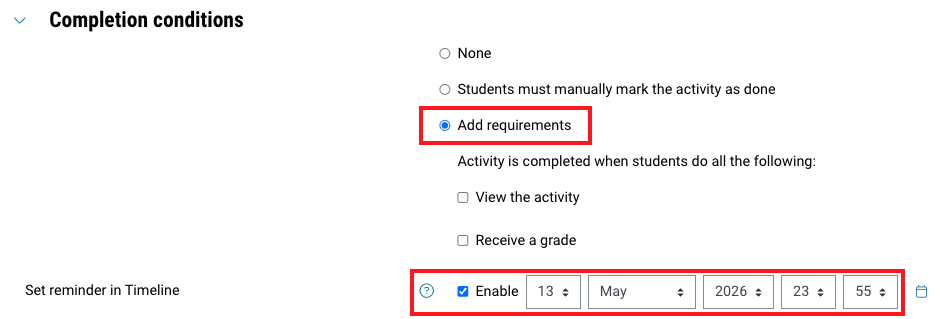
- In Completion conditions, you can enable a reminder which will allow the activity to display in the timeline and task tracker for students. Click Add requirements and ensure that the checkbox is selected for Set reminder in Timeline.
- Click Save.
- Students can now launch directly into that assignment inside Perusall from your Moodle unit via the URL link. Repeat this process for each Perusall assignment that you would like to link to directly.
Automatic grading in Perusall
Perusall is all about meaningful engagement. Perusall uses AI to automatically grade student annotations, evaluated on the basis of quality, timeliness, quantity, and distribution. Even though the top score is 2, Perusall can award a score of 3 which is a bonus point that indicates that the student’s comment or question was exceptional. A zero means that the student's comment was deemed by Perusall to demonstrate no real substance or thoughtful reading. For more information, see Annotating in Perusall scoring examples.
| Quality |
2 = Demonstrates thorough and thoughtful reading AND insightful interpretation of the reading 1 = Demonstrates reading, but no (or only superficial) interpretation of the reading 0 = Does not demonstrate any thoughtful reading or interpretation |
|---|---|
| Quantity | Overall score is calculated using the highest-quality annotations (threshold amount set by the instructor) for each assignment. |
| Timeliness | Completing the reading and posting annotations before the posted deadline is required to receive credit. You may choose to allow a grace period during which the credit for student annotations linearly decreases from 100% at the deadline to 0% at the end of the grace period. |
| Distribution | Annotating only part of the text and/or failing to distribute your annotations throughout the document lowers the overall score. |
| Overall Evaluation | An overall evaluation for each reading assignment based on the criteria above as follows: |
Note: As an instructor you can override the score in Perusall. When you override a score, you are indicating to Perusall that you deem that type of comment or question to either be worth more or less than was automatically scored. This will help modify the algorithm to better meet your requirements. You can manually override student scores from the Gradebook page by clicking on the pencil icon.

Grades recorded in the Perusall activity will be automatically synced to Moodle Gradebook once they have been released to students. Changes made to the Perusall activity will also be reflected in Moodle gradebook, for example changes to the lateness penalty. It may take up to an hour for a grade update to be reflected in the Gradebook.
To change the weighting of the activity, you would need to do this in the Gradebook setup. For more information, see the Moodle Gradebook setup guide.
Information for students
You should embed the following videos with students to provide guidance on Perusall and how to use Perusall. Follow the instructions below on how to embed these videos into your Moodle unit. Also share the following resource with students, Annotating in Perusall student guide.
- Copy the embed codes provided below each video by highlighting the text and using CTRL+C or ⌘+C(MAC).
Embed code<iframe src="https://monash.au.panopto.com/Panopto/Pages/Embed.aspx?id=2403978f-b607-4288-b7d9-ac0100261cbe&v=1" width="720" height="405" style="padding: 0px; border: 1px solid #464646;" frameborder="0" allowfullscreen allow="autoplay"></iframe> |
Embed code<iframe src="https://monash.au.panopto.com/Panopto/Pages/Embed.aspx?id=a5ed0535-eadd-4b91-8ea8-ac0700164fe5&v=1" width="720" height="405" style="padding: 0px; border: 1px solid #464646;" frameborder="0" allowfullscreen allow="autoplay"></iframe> |
- In Moodle, navigate to where you would like to embed the video.
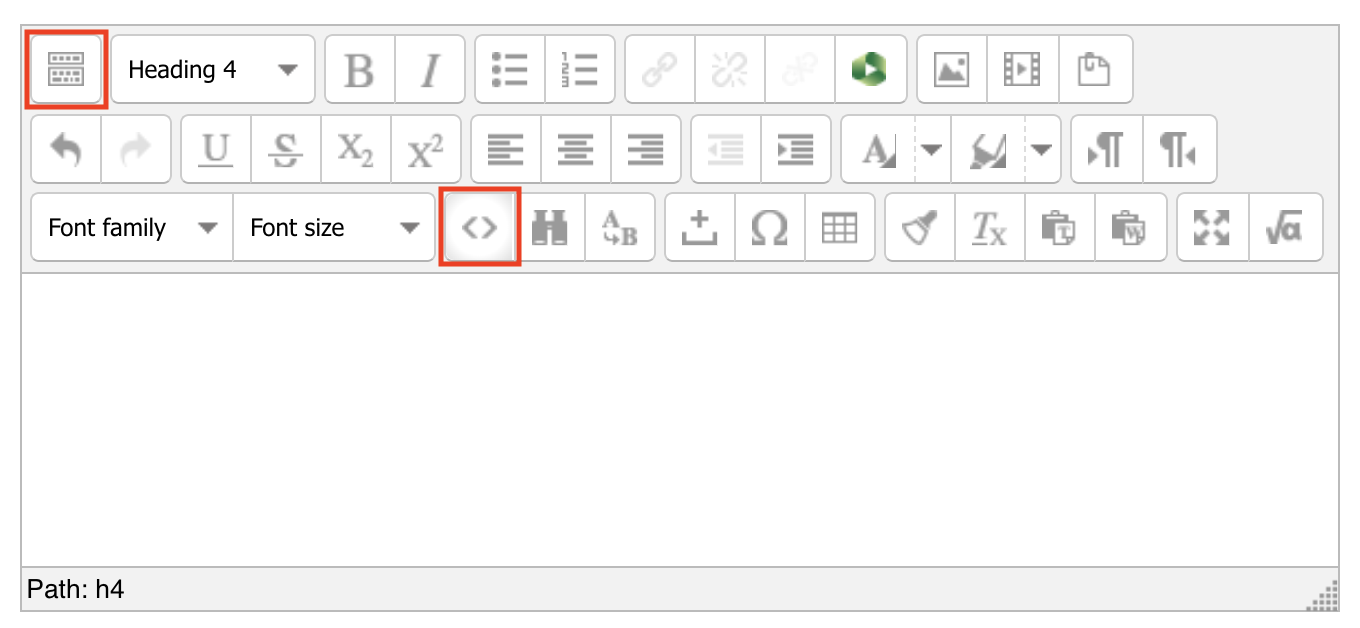
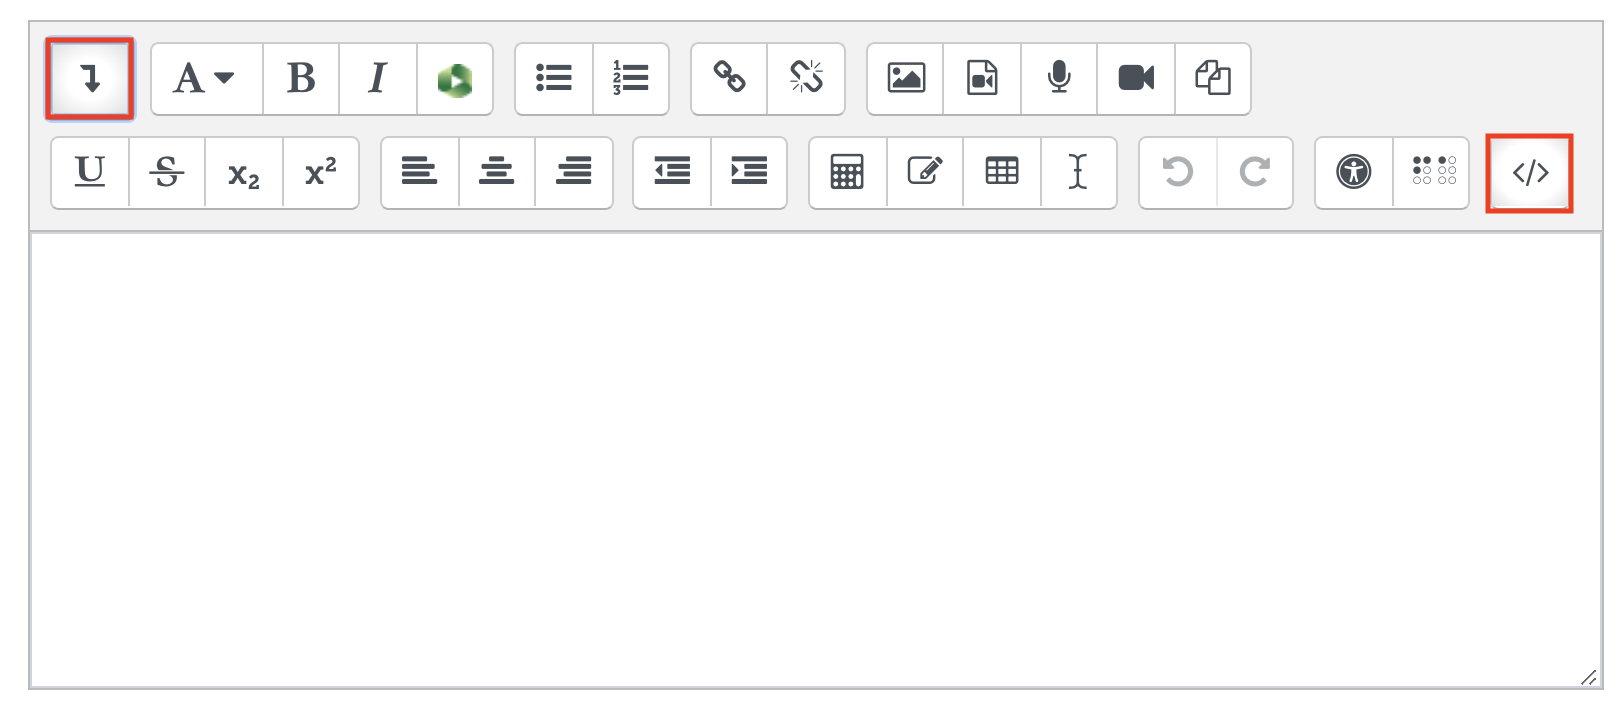
- In the text editor, Click on the Edit HTML icon.
Note: If you do not see the Edit HTML icon, click on the expand toolbar icon in the top left of the text editor. (Top: TinyMCE editor(default), Below: ATTO editor)
- Paste the embed code in the HTML window and click Update.
- When you are finished, click Save and return to unit or Save and display.
- The video should now be embedded in Moodle.
Additional Information
- Additional Resources for Educators
- Additional Resources for Students
- Additional Resources for Institutions