Create ePortfolio pages and templates
ImportantBefore creating an ePortfolio, contact your Faculty Educational Designer before using the ePortfolio tool to ensure optimal setup and usage. |
You can create a template portfolio that you can share with students. This allows you to scaffold portfolio pages or a collection of pages with preset block containers and optional text instructions to guide students when creating their own portfolio. Once students have made a copy of the template, they can add artefacts to the preset blocks, and edit any part of the portfolio except for the instructions, which cannot be edited.
Key terms
- Page: An individual portfolio page.
- Collection: A group of portfolio pages.
- Blocks: Containers for different types of content.
- Artefacts: Content in the ePortfolio includes reusable elements such as images, files, video, plans and tasks, journals and entries, and notes created on individual pages.
Watch the video below for a quick overview of how to create ePortfolio templates (5 min 15 secs)
Expand the accordions below for step-by-step instructions
-
- From the ePortfolio landing page, click on Create.
OR
Click on the main menu icon, expand the Create section and select Portfolios.
- From the Portfolios page, click +Create.

- Select Page.

- Give your page a title and a description.

- Expand the Advanced options:
- Include optional instructions in the text field. This will appear inside a collapsible instructions field at the top of the page.
- For Prevent removing of blocks, click the button to toggle the option to Yes. This will prevent students from having the option to delete blocks when they are editing the page. Students will still be able to adjust the size and placement of blocks.
Note: This will also hide the delete block option from your view when in edit mode. You may wish to leave this setting set to No until you have finished building your template and are ready to share it with your students.
- For Template, click the button to toggle the option to Yes.
- For Review, click the button to toggle the option to Yes if students will require external reviewers to sign-off on their work.
- Click Save.
- From the ePortfolio landing page, click on Create.
-
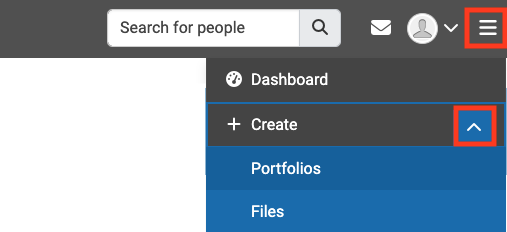
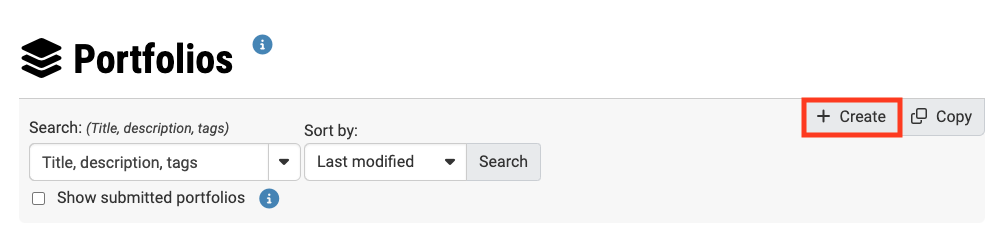
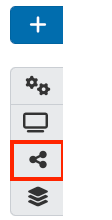
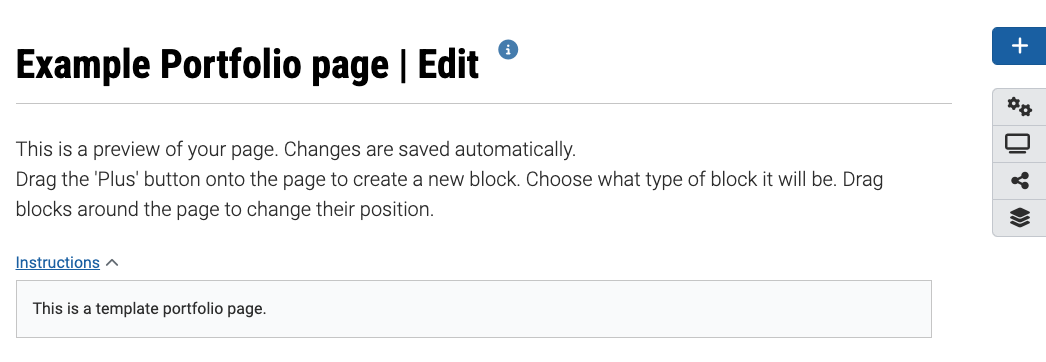
Once you have created a page, you can start adding blocks and artefacts. The icons on the right hand side menu allow you to quickly access different pages. From top to bottom:
- Blue plus icon: Add new block.
- Settings cog: Edit page settings
- Preview page: Preview your page
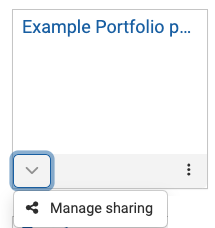
- Share settings: Manage the sharing settings for your page
- Portfolio: Return to the Portfolio page

- In edit mode, you can click and drag the blue plus icon to where you would like your new block to appear
- Give your block a title.
Note: You can leave the title blank, however if left blank you will not be able to make the block expand/retract (similar to an accordion).
- Click Show more to view additional block types. You will need to click Show more multiple times to view all block types.
OR
Click the blue plus icon at the top of the right hand side menu. The Add new block pop-up window will appear. In Position, you can choose if your new block will be added to the top or bottom of the page, then click Add.
Note: If you do not see the blue plus icon, you may be viewing the page in preview mode. Click the pencil icon in the right hand side menu to return to edit mode.
Click on the plus icons below to learn more about each block type
-
Text A text field with basic formatting options. Images can also be added using this content type.
Image An image field which allows you to upload images directly from your device or select an image from your files. Files (to download) This field allows you to upload a file (ie. PDF or word document) directly from your device ofr select a file from your files. This option does not provide a viewing pane, just the option to download the file to the viewers device.
Embedded media This field allows you to upload video or audio files directly from your device or select video or audio files from your files.
Note: The embedded media block will store the video file in your ePortfolio account files (the default total size limit is 900 MB). It is strongly recommended that you instead use External media block which allows you to embed videos using URL or iframes for videos that are hosted on external sources such as Youtube, Panopto, Vimeo, etc.
Journals - Journal: This field allows you to add an entire journal to your ePortfolio page. The journal must have been created prior to adding this block, and any subsequent journal entries will be added automatically.
- Journal entry: This field allows you to add a single journal entry to your ePortfolio page. The journal and journal entry must have been created prior to adding this block.
- Recent journal entires: This field allows you to add recent journal entries to your ePortfolio page.
- Tagged journal entries: This field allows you to add journal entries that have been tagged. Tags must have been created and added to a journal entry or entries prior to adding this block.
Folder This field allows you to upload an entire folder from your files onto your page. The folder must be created prior to adding it to the ePortfolio page. Image gallery This field displays multiple images in a gallery, which the viewer is able to scroll through. There are two available when using this content type:
- You can select a folder of images already created in your files. Any images added to the folder after it has been created will be added to the gallery automatically, or;
- You can select images individually, either through uploading them directly from your device or by selecting them from your files.
PDF This field allows you to upload a PDF file from your device or select a PDF from your files, enabling a viewing pane for the viewer to scroll through each page. Viewers are still able to download the document using this content type. Some HTML This field allows you to display the content of a HTML file in a page. Comments This field displays comments made by viewers of the page in the ePortfolio page itself rather than just down the bottom of the page. Annotation This feature is used in conjunction with SmartEvidence. You can use the Annotation block without SmartEvidence, but then you can’t choose a competency standard. You can write your annotation for your portfolio page. The annotation helps connect the evidence on the page to the standard or competency you selected to associate it with in the competency framework. Once you have saved an annotation, you cannot change it any more. You can still add changes as part of the feedback functionality. Peer assessment Allow peer reviewers to give feedback. You can place this block onto a page multiple times so that a peer can give feedback for different sections. You must give a person the ‘Peer’ role when sharing the portfolio page for them to be able to add their assessment. Creative commons licence This field adds a Creative Commons License to your ePortfolio. For more information about Creative Commons, see Copyright free and Creative Commons resources.
Navigation This field allows you to create a Table of Contents directly linked to pages within a Collection. The collection needs to be created prior to adding this block.
CPD This plugin allows a simple log of Continuing Professional Development (CPD) activity to be maintained. It includes fields for the start date, end date (if appropriate) title, location and description of the CPD activity together with the time spent (hours). A rolling total of time spent on CPD is also calculated. Plans This field allows you to add a plan to your ePortfolio page, enabling you to ‘check off’ each task within your plan. The plan needs to be created prior to adding this block. Recent forum posts This field allows you to add recent forum posts from within the platform to your ePortfolio page. The field will update when new posts are made. Note This field allows you to add a note to your ePortfolio page. The note can be written into the text box directly, sourced from previous notes already created in the system or created from files uploaded from your device. Profile information This field allows you to add specific aspects of your profile to your ePortfolio page. Your profile must be created prior to adding this block. Social media This field allows you to add a link to your social media on your ePortfolio page. The specific social media must be added to your profile information prior to adding this block. Resume - My entire resume: This field allows you to add your entire resume to an ePortfolio page. Your resume must be created prior to adding this block.
- One resume field: This field allows you to select one field of your resume to an ePortfolio page. Your resume must be created prior to adding this block.
External feed This field allows you to add a social media feed to an ePortfolio page. To add the feed you must first obtain a valid RSS feed. External media This field allows you to add audio visual content that is hosted on an external platform, such as YouTube, Panopto, Vimeo, or Google Workspace. Google apps This field allows you to embed Google Workplace content into your ePortfolio page. Open Badges Display your badge collection to show recognition of skills and competencies online. This block is only available when you have the Open Badge Displayer plugin installed and you must have already pushed at least one badge.
Note: To embed videos, it is strongly recommended that you use External media instead of embedded media block type. The External media block allows you to embed videos using URL or iframes for videos that are hosted on external sources such as Youtube, Panopto, Vimeo, etc. While the embedded media block will store the video file in your ePortfolio account files (the default total size limit is 900 MB).
- Click on the type of block you would like to add.
- The block settings displayed will depend on the type of the block you have selected. Once selected the type of block cannot be changed. Instead create a new block and remove the undesired block. For instructions on how to set up all block types, see the Blocks guide.
- Click on Instructions to expand the instructions textbox and insert any guidance for students. The instructions will be expanded when students are viewing the template page in edit mode, and cannot be deleted.
- You can leave the block content blank, insert placeholder text or lorem ipsum text. Students will be able to add, remove or modify content within the blocks.
- If you have set Prevent removing of blocks to Yes, students will not be able to delete blocks. However they will still be able to adjust the size and placement of blocks.
- Click Save.
Once a block has created, you can edit it a number of ways:

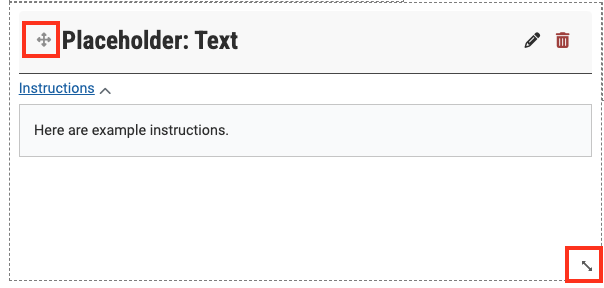
- Click the pencil icon to return to the block settings and continue editing.
- Click the bin icon to delete the block.
- Click and drag the header to adjust the placement of the block on your page.
- Click and drag the bottom left corner to adjust the size of the block. You can also click and drag the left or bottom ledge to adjust the width and height respectively.
-
A collection is a collection of individual portfolio pages. When shared as a template, students have the option to copy an entire collection of pages or individual pages of a collection.
- From the ePortfolio landing page, click on Create.
OR
Click on the main menu icon, expand the Create section and select Portfolios.
- From the Portfolios page, click +Create.

- Select Collection.

- Give your collection a name and a description. This will appear on the collection and the Portfolio page.
- Add optional tags. This is recommended if you have a large number of pages and collections.
- If required, select the framework you require for the collection from the SmartEvidence framework dropdown list.

- Click Next: Edit collection pages

- To add pages to the collection, you can:
- Drag and drop them to the box on the right.
- Select the checkboxes for the pages and click +Add pages.
- Click All to select all pages and click +Add pages.
- When finished, click Continue: Share.
- You can choose to share your collection or skip this step for now. For more information, see the next section Share templates.
- Click Save. You will see the first page of your collection. If you have selected a SmartEvidence framework this will be displayed as the first page. For more information, see Set up a SmartEvidence framework.
- Your collection will also now appear on the Portfolios page.
- From the ePortfolio landing page, click on Create.
-
Once your template is ready, you can share it with individual users or groups. You can also choose to “push” a template to the users in a selected group, allowing the template to appear automatically on their account.
- From your ePortfolio template, click on the Share icon in the right hand menu.

OR - From the Portfolios page, click on the padlock on the page or collection that you want to share and select Manage sharing.

- Expand the Advanced options.

- For Allow copying, click the button to toggle the option to Yes.
- For Retain view access on copied portfolios, click the button to toggle the option to Yes.
- You can also choose to set a start/stop date for when users can access the portfolio you have shared with them. This will override any dates set individually for from/to dates.
- In the Shared with section, use the drop down lists to specify who you would like to share your template.
- Group: Any Moodle units/groups you have access to will appear here. Use the search bar to filter your search results.

- You can share with as many users or groups as needed.
- Click Save.
Share ePortfolio with Secret URL
You can also share an ePortfolio Pages or Collections using a secret URL. You can use this method to share with students or with people outside the University, such as subject specialists or external examiners. The secret URL allows users who do not have a Monash ePortfolio account to access the portfolio, without making it publicly available and searchable.
Watch the video below
- Navigate to the Manage sharing page of the selected page or collection you would like to share.
- Click +New secret URL. This will generate a unique link which external users can use to access your ePortfolio. You can create multiple secret URLs this way.
- Once created, you can:
- Click the copy icon to copy the URL onto your clipboard. You can then copy and paste the link wherever you would like to share it, for example via email or in your Moodle unit.
- Click the pencil icon to edit the access dates. If specified, users will only be able to access the ePortfolio via the secret URL link during that time. If not specified, access will not expire.
- Click the bin icon to delete the secret URL. This will remove access to your ePortfolio via the secret URL link.
- From your ePortfolio template, click on the Share icon in the right hand menu.
-
Once you have shared your template, students should be able to see it in their Shared with me section. Students can then make a copy of the template.
Watch the video below to learn how to copy a template in Monash ePortfolio (1 min 29 secs)
- Click on the hamburger icon in the top right corner, expand the Share section.
- Click Shared with me to view a list of portfolios that have been shared with you.

- Click on the title of the shared portfolio.
- Click on the three dots on the right hand side of the page and select Copy. You can choose to either copy a single page or a whole collection, if applicable.

- Once copied, you will be able to see it on your Portfolio page and edit it freely, with the exceptions of instructions that cannot be edited or deleted.
Note: Once a copy has been created, if changes are made to the original template, these changes will not automatically be updated in the copies of the portfolio. Students will need to recopy the template to see an updated version.