Amend results
Once student results have been submitted to Callista via the Submit Results page, any changes to these results can be managed directly in your Moodle site using the Amend results page.
Key features of result amendment in Moodle:
- Amendments can be created for one or more students in a Moodle site.
- You can view the progress of your amendments at any time as well as view any completed amendments (for example approved or cancelled).
- Once an amendment is submitted it will automatically route to individuals within your faculty for approval.
- When an amendment is fully approved, Moodle will automatically submit the amendment to Callista to update the student record (in Callista) as well as update the student result in the Manage Results page.
Amend results components
 Amend Results (Chief examiners)
View
Amend Results (Chief examiners)
View

The Amend results page can be utilised to create new amendments for students in your Moodle site. You also can view the progress of your amendments at any time, including fully approved, not approved and cancelled requests on the Amend Results page. You can add amendments for individual students or bulk amend results using the .xlsx template provided on the Amend Results page.
Bulk amend results
- To navigate to the Amend Results page, click on More in the top banner menu and select Amend Results from the dropdown list.

- At the top of the page, you will see a link to results. Click here to download the class list pre-formatted with the correct fields. Please remember to delete students from the list who you do not wish to create results amendments for.

- The following fields are mandatory:
- Student ID
- Offering
- Mark
- Grade
- Reason for Amendment (dropdown selection)
- Eligibility for Supplementary Assessment (dropdown selection)
- Expected Resolution Date
- Notes
Note: Do not modify or rename any existing column headers. You may add additional columns or reorder the columns as needed.
In the spreadsheet, amendment details will need to be completed for each student listed as follows:
-
To amend to a numeric mark and grade (N, P, C, D, or HD):
- Enter the numeric mark in the Mark column only. Leave the Grade column empty. The system will calculate the correct grade based on the mark.
- Provide a Reason for Amendment.
- Provide Notes. All Notes remain in Moodle for reference.
Note: When the amended result is between 45 - 49 N, you will be prompted in the page to specify if the student is eligible for NS (supplementary assessment) or not eligible due to academic misconduct / unit exemption as documented in the handbook.
-
To amend to WH grade:
- Update the Grade column only (WH). Leave the Mark column empty.
- Provide a Reason for Amendment.
- Provide Expected Resolution Date.
-
To amend to NH grade:
- Update the Grade column only (NH). Leave the Mark column empty.
- Provide a Reason for Amendment.
Upload XLSX file
- Once you have made all your amendments, save your file as an .xlsx file.
- Return to the Amend Results page.
- Click the Create New Request button. A new window will open.
- For Amendment mode, select Bulk.
- Click the Choose file button and select your amended file, or click and drag your .xlsx file into the file upload area.
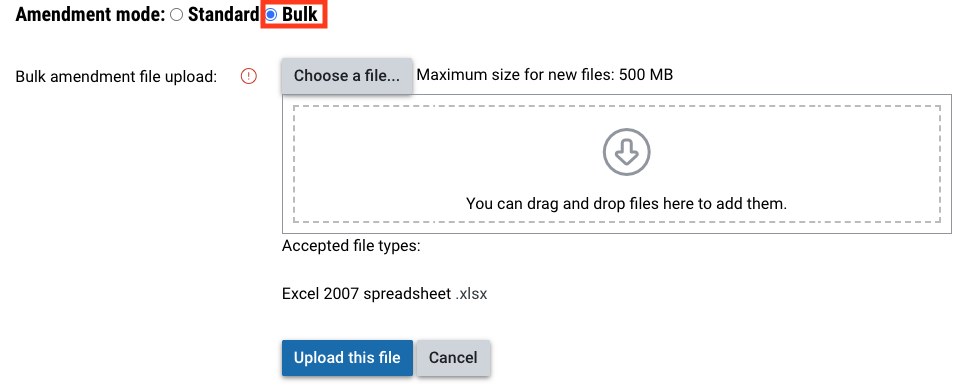
- Click Upload this file.
- Click the Next button to proceed to the final step.
Create a new amendment
- To navigate to the Amend Results page, click on More in the top banner menu and select Amend Results from the dropdown list.
- To create a new amendment for one or more students in your Moodle site, click the Create New Request button. A new window will open which will guide you through 3 steps to complete the request.
- In Amendment mode, select Standard.
Select students
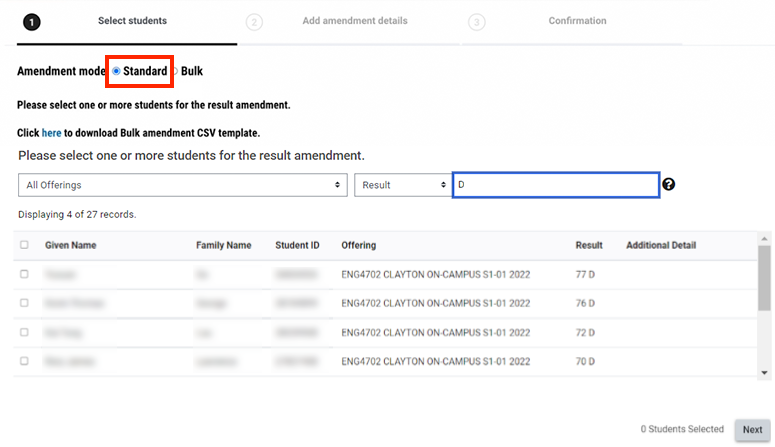
- Select one or more students, for whom you wish to amend results, using the checkbox to the left of the student row. A student cannot be selected for an amendment when:
- The result has not yet been submitted successfully to Callista via the Submit Results page.
- The student already has an in progress amendment request awaiting faculty decision.
- Where a Moodle site has unit offerings across multiple teaching periods, amendments can only be processed for students from one teaching period at a time.
Note: You can use the filters to bulk select students based on their current results e.g. D, P, DEF, NS etc.
- Click the Next button to proceed.
Add amendment details

Amendment details will need to be completed for each student listed as follows:
-
- Select Mark/Grade selection as Mark.
- Enter the new student mark (must be an integer) in the Amended Result. The grade will automatically display based on the mark entered.
- Select an applicable Reason for Amendment from the drop down list.
- Enter Notes to provide further context for your faculty as to why this amendment is required. Notes are mandatory for a mark to mark amendment.
Note: When the amended result is between 45 - 49 N, you will be prompted in the page to specify if the student is eligible for NS (supplementary assessment) or not eligible due to academic misconduct / unit exemption as documented in the handbook.
-
- Select Mark/Grade selection as WH. WH automatically displays in the Amended Result column (read only).
- Select an applicable Reason for Amendment from the drop down list.
- Enter a WH Expected Resolution Date. This is the date by which you expect that WH grade to be adjusted to a final result for the student. The date entered will be used by Faculty Professional staff ONLY and is for indicative and follow up purposes. The date does not trigger any automated processes or emails. If the date is unknown, enter the best estimate. For Academic Integrity Investigation, if the date is unknown, enter two months from the current date.
- Enter Notes to provide further context for your faculty as to why this amendment is required.
Note: An NS grade can also be changed to WH as long as the appropriate fields are included (Reason, Resolution Date, and Notes).
-
- Select Mark/Grade selection as NH. The result 45 NH automatically displays in the Amended Result column (read only).
- Select an applicable Reason for Amendment from the drop down list.
- Enter Notes to provide further context for your faculty as to why this amendment is required. Notes are mandatory for a mark to mark amendment.
Click the Next button to proceed to the final step.
Confirmation
- In the section Reviewer/Approver if there are any Select boxes displayed, you will need to make a selection as per instructions from your faculty.
- Tick I Agree checkbox for the Amendment submission statement in order to proceed to press the Submit button.
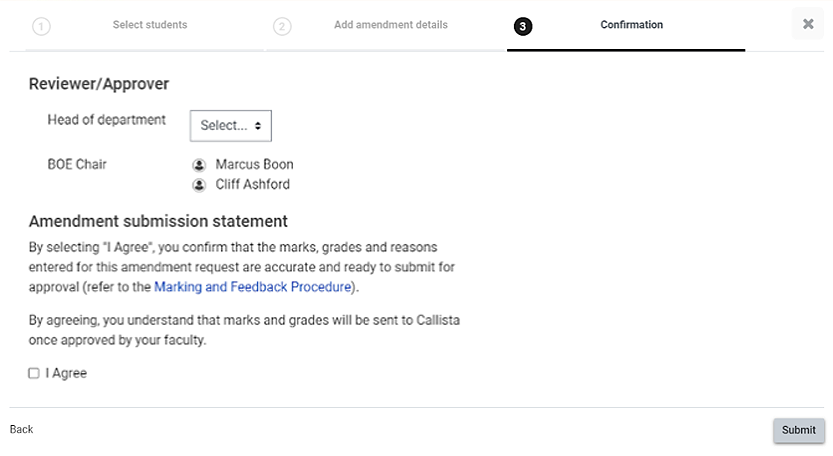
- Once the Submit button is pressed, you will see a notification as follows: Your amendment request has been submitted for approval. Click the Back to Amend Results button to return to the Amend Results page.
Amend results page

In the Amend Results page you can view a listing of all amendments associated with your Moodle site as follows:
- In Progress: amendment is awaiting decision from pre-configured faculty approvers.
- Result Amended: amendment has been fully approved and the student record has been successfully updated in Callista.
- Not approved: amendment has been marked as not approved by a pre-configured faculty approver and the student record will not be updated.
- Error: amendment has been fully approved however was not able to be submitted to Callista with success.
Note: Result amendments submitted after the course was completed will result in an error. These amendments will have to be keyed into Callista directly. Please contact your faculty results administrator.
- Cancelled: amendment has been cancelled by the requestor (note that the ability to cancel request is coming in a future Moodle release).
Note: You can use the filter and search to view results amendments for specific offerings or students. You can also filter result amendments based on any of the columns present on the page.
Admin notes
Results Administrators and Results Managers can also create Admin Notes. Admin notes are visible only to Results Administrators and Results Managers reviewing the request. They can be used to support internal tracking, decision context, and handover within the results approval workflow. They do not replace the Note field that is required to submit an amendment.
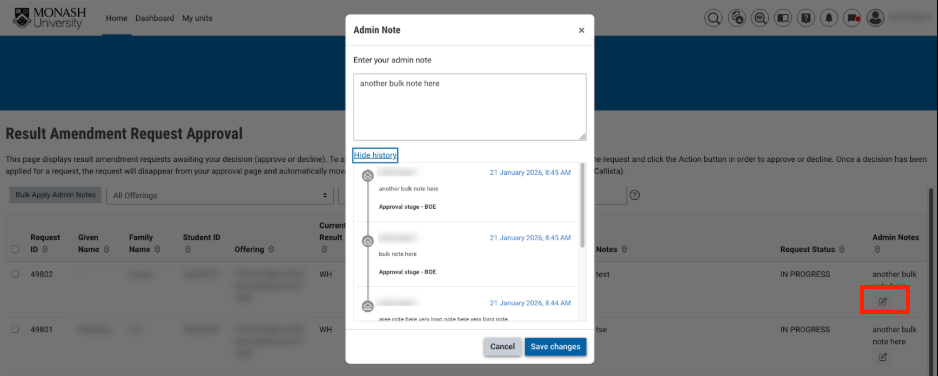
You may also create Admin Notes for multiple students by selecting students and clicking the Bulk Admin Notes button. This is useful for managing amendments affecting multiple students for the same reason.
Cancel an In Progress amendment request
When an amendment request has the status IN PROGRESS, it can be cancelled by the person who requested the amendment as follows:
- In the Action column click on the ellipses.
- The Action menu will appear and click Cancel.
- The status of the amendment will update to CANCELLED and is removed from your faculty approver queue for an approve/not approved decision.
Fully approved amendment requests
Once an amendment request has been fully approved and submitted with success to Callista, it will display in the Amend Results page with the status of RESULT AMENDED.
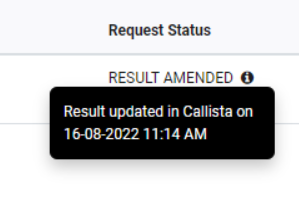
Tip: Hover over the ⓘ icon to view when the result was updated for the student in Callista.
Additionally, the Manage Results page is updated with the amended result for the student in the override column as well as the comment for the result (visible with prefix RM_Amended).

Note: When a student has been approved for special consideration for their scheduled final assessment and this occurs after the Chief Examiner has submitted results to Callista via Submit Results, an automatic result amendment will be created for the update of the student result to DEF. This will be visible in both the Amend Results and Manage Results pages.
If there was an in progress amendment for the student at the time of an automatic DEF result amendment, the in progress amendment will be cancelled by Moodle and the status of that amendment will change to AUTO CANCELLED.
 Amendment Approval Dashboard (Faculty result managers)
View
Amendment Approval Dashboard (Faculty result managers)
View
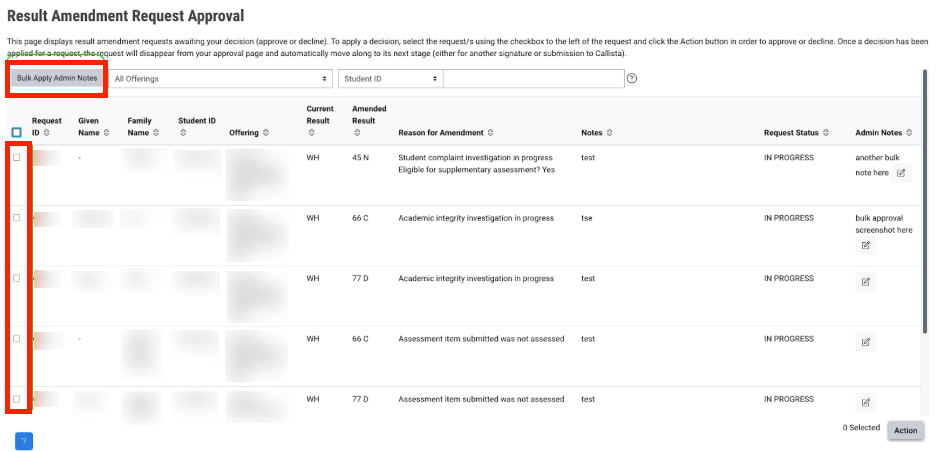
The Result Amendment Request Approval page displays result amendment requests awaiting your decision (either approve or decline). If you have been configured as an approver for amendments for your faculty, you will receive a notification once daily if there are any outstanding amendment requests awaiting your decision.
Watch a demonstration of the result amendment request approval workflow (18 minutes)
Approve or decline amendment requests
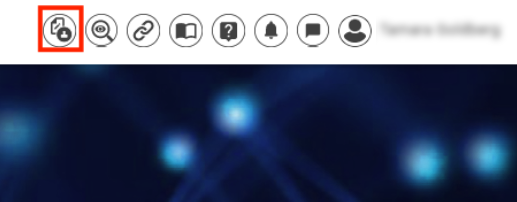
- To navigate to the Result Amendment Request Approval page, click the amendment approval icon which is visible on the top right navigation menu of Moodle. If you have been configured by your faculty as an approver, you will be able to view this icon. It is visible from any Moodle page you visit.
- The Result Amendment Request Approval page will display any amendment requests awaiting your decision. If the page is empty and contains no requests, there are no outstanding decisions required from you.
By default, the amendment requests most recently submitted appear at the top of the list. You can also sort columns and filter results by Unit Offering, Student ID, and other fields in the Approver Dashboard.
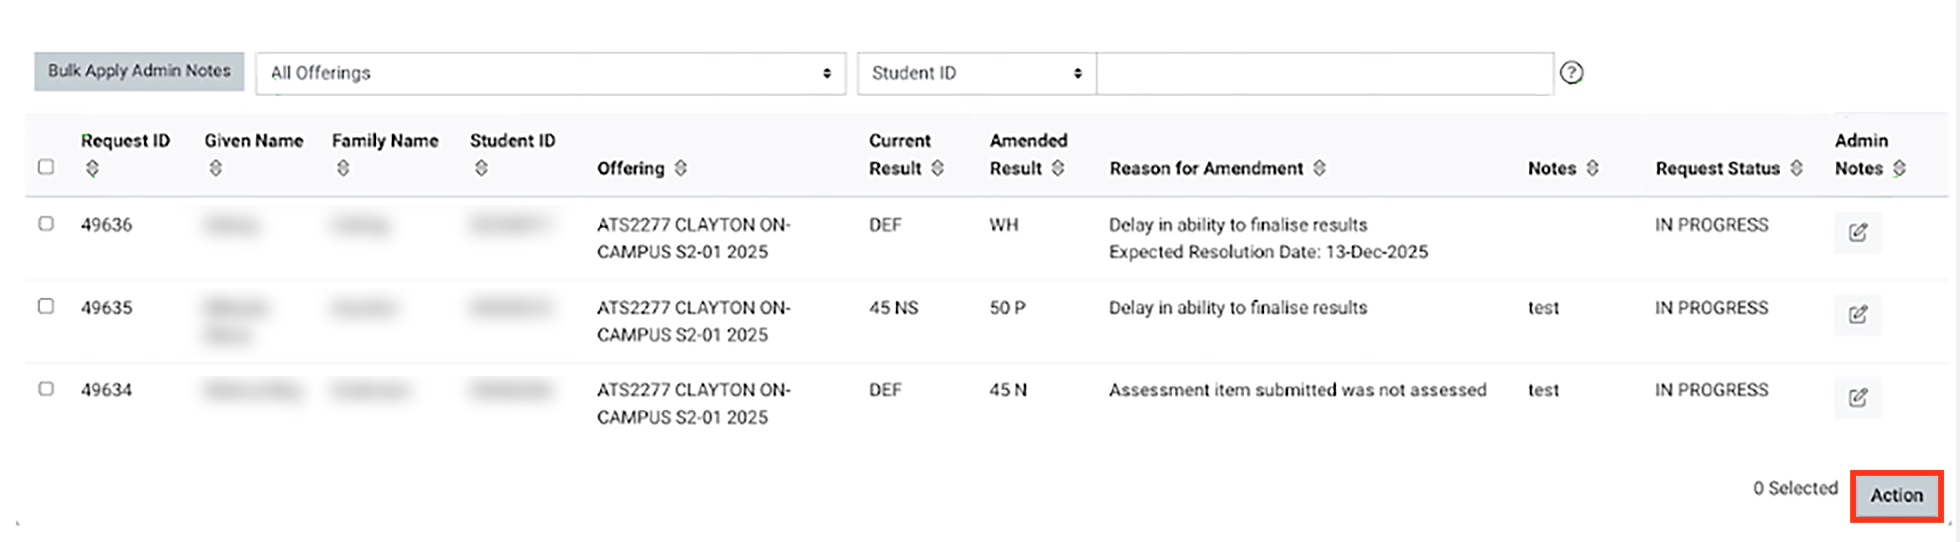
- To apply a decision, select one or more amendment requests using the checkbox to the left of the request and click the Action button.
- Select either Approve or Decline to apply your decision to the selected requests.

- A pop up window will display confirming you wish to apply the approve or decline decision.
- If you choose to decline the amendment, select a reason from the dropdown list and provide additional information in the text box field. The requestor and Result Administrator will receive an email notification that the request has been declined along with reasons.

- Click Save changes to confirm and proceed.
- The Result Amendment Request Approval page refreshes and amendment requests that were approved or declined no longer appear in your queue for decision.
Note: These requests have automatically progressed to the next stage for approval which is either for another signature/amendment decision or for submission to Callista to update the student record.
 Result Amendment Request Approval Configuration (Faculty professional staff)
View
Result Amendment Request Approval Configuration (Faculty professional staff)
View
The Result Amendment Request Approval Configuration page can be utilised to create and manage the individuals who can approve result amendments in your faculty.
The result amendment approvers can be defined for each of the following result stages:
- Pre-BOE - amendment submitted for approval prior to a Faculty BOE.
- BOE - amendment submitted by a Results Admin after a Faculty BOE and prior to a result release.
- Post-BOE - amendment submitted for approval after a Faculty BOE.
NoteOnly individuals with the role Results Admin can access this page. For access to this role, please fill out the Request for Moodle (Results Management) Access form. |
Configure Result Amendment request approvals
- To access Result Amendment approval configuration, navigate to your faculty's Moodle category folder.
- Click the administration cog on the right hand corner and select Result Amendment request approval configuration.
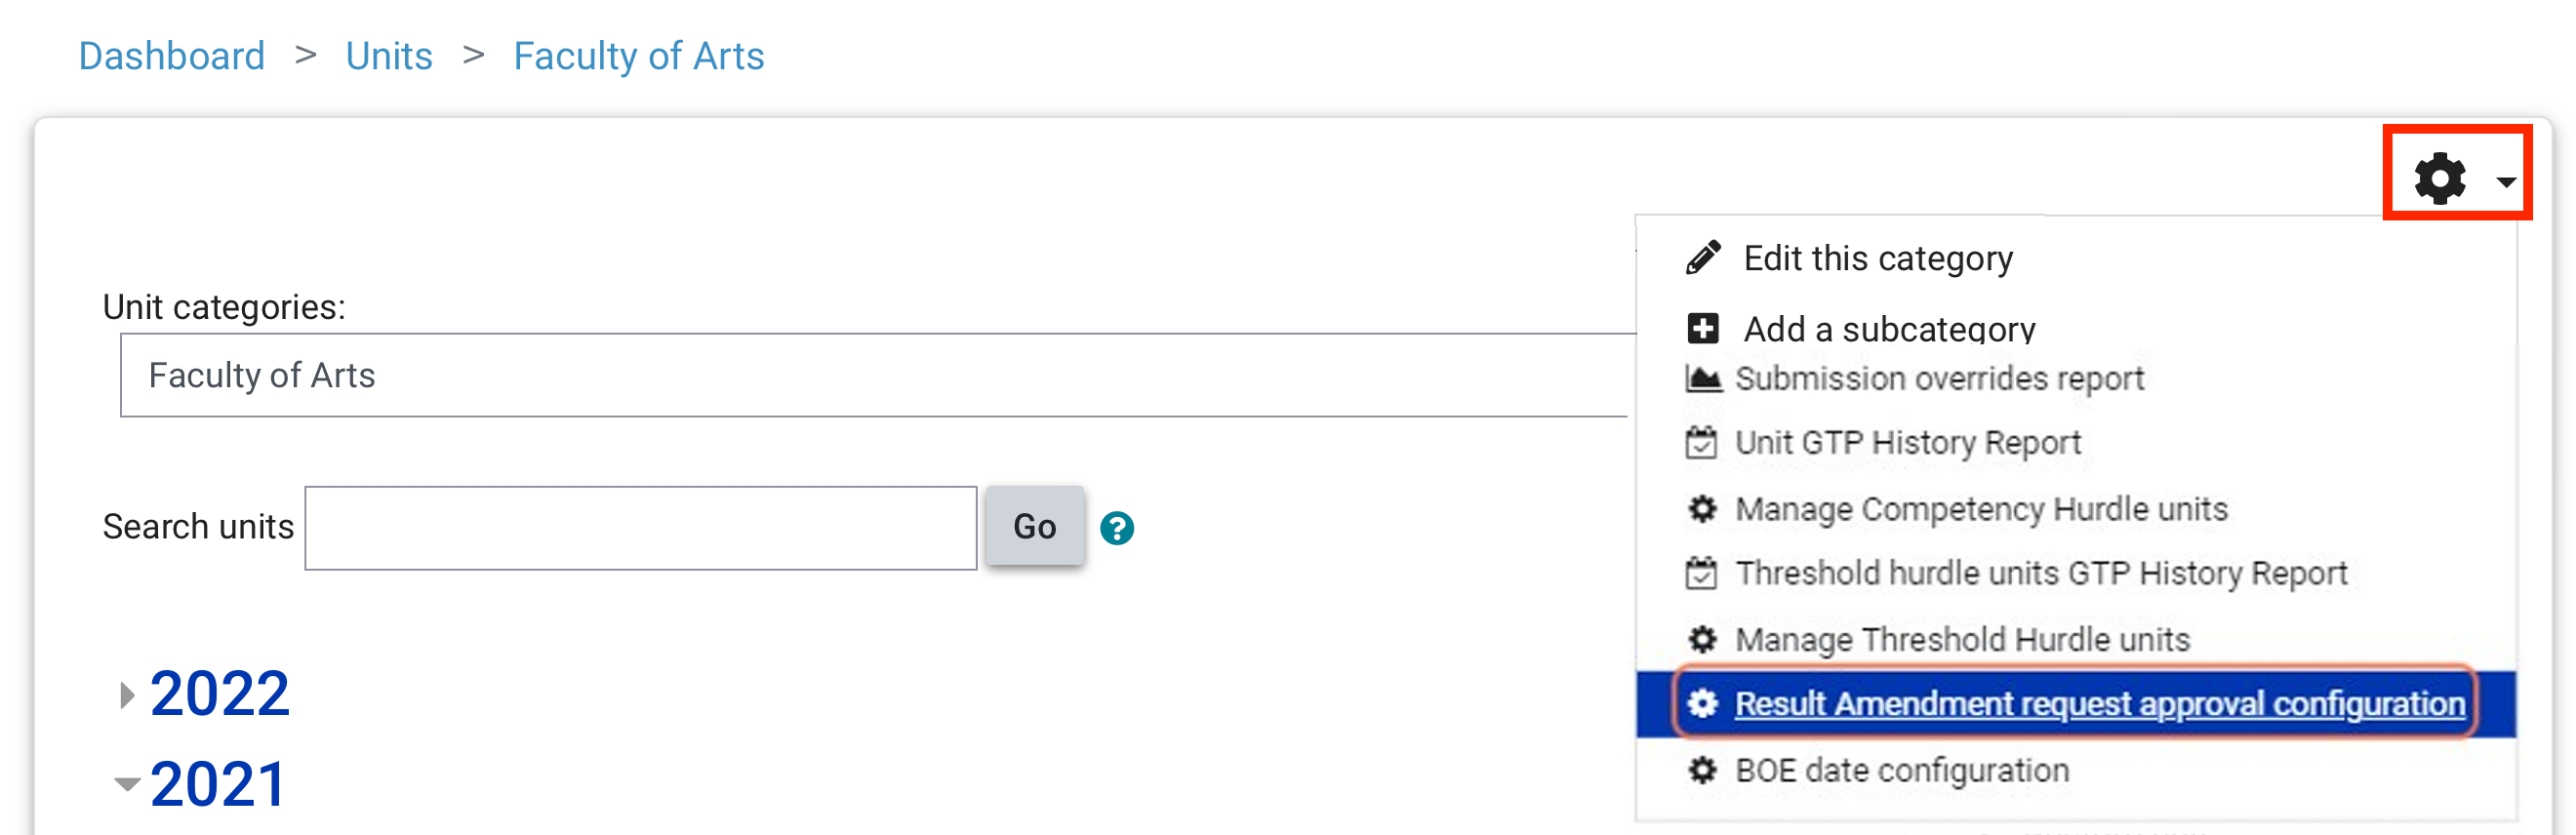
- Select Pre-BOE, BOE or Post-BOE as per the result stage you wish to configure, then click Edit workflow.

The workflow can consist of the following:
- Approval stages: Configure the number of stages of approval required for amendments
- Groups: One or more groups can be created in a stage. A stage should have at least one group configured.
- Individual approvers: One or more approvers can be added to a group. You can now add approvers to the existing approval groups in the approval workflow when there are in progress amendment requests.
-
Add approval stage
- Click on the plus sign to create a new approval stage.
- Enter an approval stage name and click Save.

- The approval stage will now be displayed in the workflow.
Add approval group
- Click +Add approval group to create a new group within the approval stage.
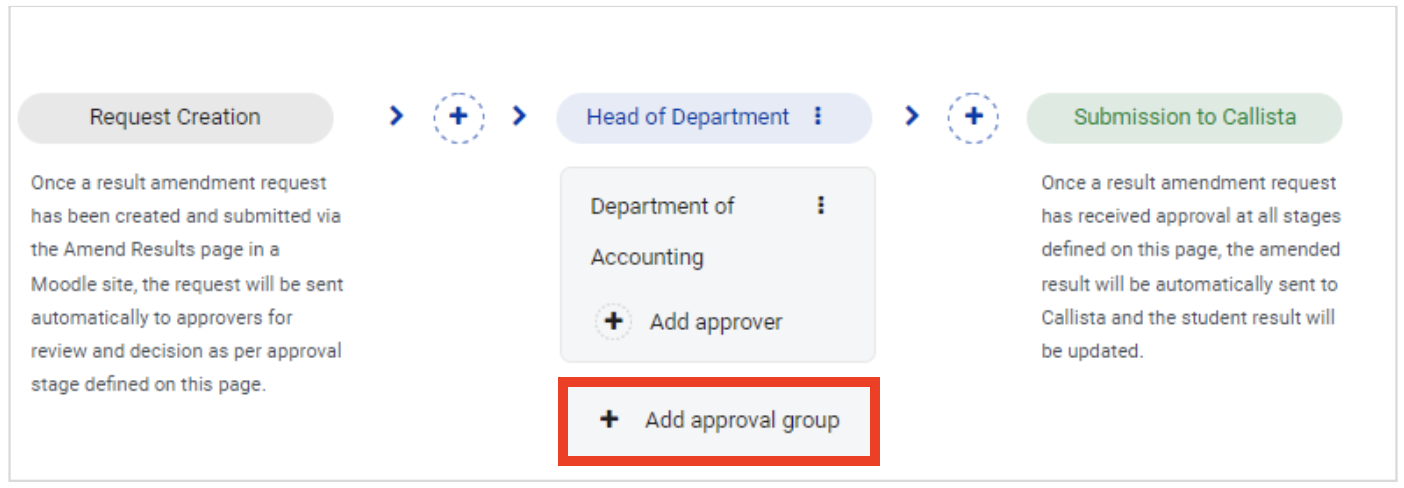
- Enter an approval group name and click Save.
- The approval group will now display within the stage in the workflow.
Add approver
- Click +Add approver to add an approver to a group.
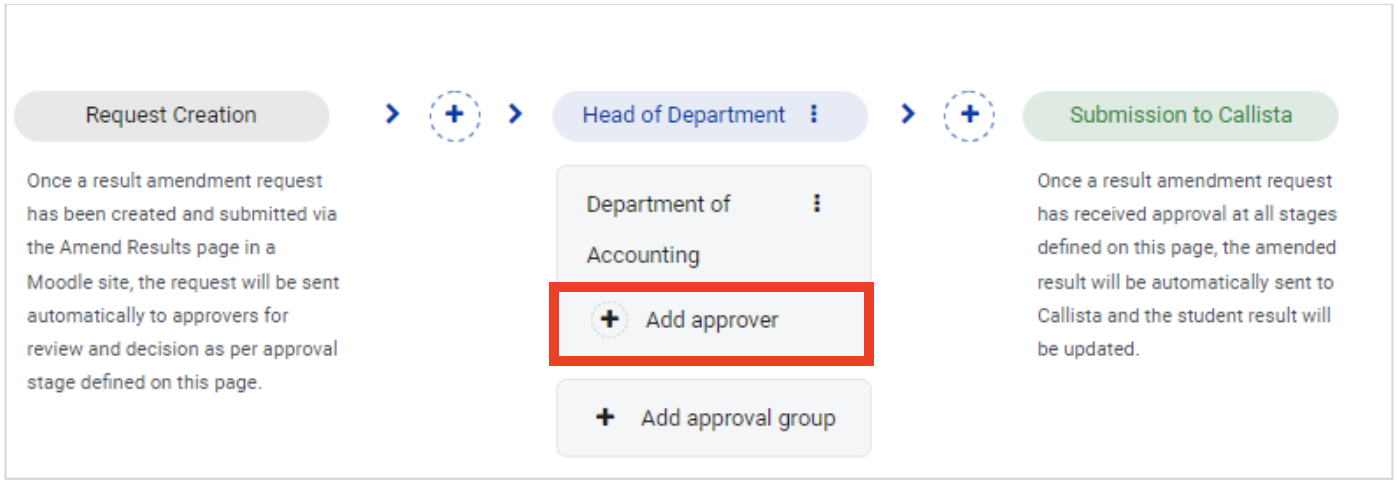
- To add an approver, start typing either a Monash ID, first name / given name or Monash username in the 'Search' text entry area. The approver must have either the Results Admin or Results Manager role in Moodle in order to appear.

- Select the desired approver and click Save.
Note: If no approvers are configured in a group, if that particular group is selected in an amendment (by a Chief Examiner), that approval stage will be bypassed and the amendment will progress to the next configured approval stage/group for a decision.
Note: Only one approver can be added at a time.
-
Remove approver
- Click on the approver name and a pop up will appear titled Remove approver.

- Click Remove approver to remove an approver from a group.
Edit or delete approval group
- Click on the ellipsis next to the group name and the Edit approval group window will pop up.
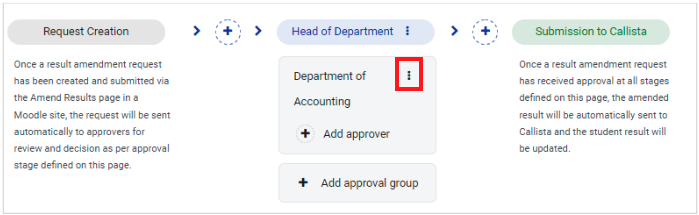
- Type the adjusted group name and click Save or click Delete approval group to delete the group.

- All approvers within the group will also be deleted with the group.
Edit or delete an approval stage
- Click on the ellipsis next to the stage name and a pop up will appear titled Edit approval stage.

- Type the adjusted approval stage name and click Save or click Delete approval stage to delete the stage.
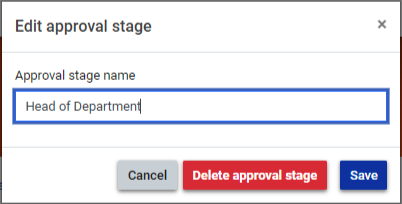
- All groups and approvers within the groups will also be deleted with the approval stage.
- Click on the approver name and a pop up will appear titled Remove approver.
When you are finished, click Save workflow. If you wish to discard your changes, click Discard changes. All changes applied to the workflow since clicking the Edit workflow button will be discarded.
Note: Changes to a workflow can only be saved when there are no in progress amendments. This ensures that an existing (in progress) amendment approval workflow is not disrupted or broken by any updates to the approval workflow.
When no approval workflow has been configured for a faculty in Moodle, the ability to create amendments for units in that faculty will not be enabled.
 BOE Date Configuration (Faculty professional staff)
View
BOE Date Configuration (Faculty professional staff)
View
The BOE Date Configuration page can be utilised to configure a faculty BOE date/time and results release date for each teaching period. The dates configured ensure that a submitted amendment is directed to the correct approval group, depending on whether it is Pre or Post-BOE. If no date is entered for a teaching period, the Post-BOE approval path will be utilised by the result amendment as a default.
The dates configured also establish a ‘window’ between faculty BOE and result release date within which a Results Admin can submit a faculty BOE ratified amendment. It is important to ensure that all applicable teaching periods for your faculty have dates configured in this page for the current year. Configuration of dates will be required each new year.
NoteOnly individuals with the role Results Admin can access this page. For access to this role, please fill out the Request for Moodle (Results Management) Access form. |
Configure BOE dates
- To access BOE date configuration, navigate to your faculty's Moodle category folder.
- Click the administration cog on the right hand corner and select BOE Date Configuration.

- The BOE date configuration page displays a list of teaching periods for the current year (the filter for the page is set to current year as a default). This year can be changed in the filter as required.

- To search for a specific teaching period, type the teaching period into the filter text box and the listed teaching periods will update as you type. You can enter multiple teaching periods separated by comma, for example S1-01, S2-01.
- To configure the dates for a teaching period, select the teaching period via checkbox and click the Configure button. The Configure Dates pop up appears as follows:

- For the teaching period/s listed:
- Select the BOE Date and Time in line with your faculty BOE calendar.
- Select the Result Release Date as set by SEBS for the teaching period.
- Click Save changes to proceed to save these dates for the selected teaching period/s or click Cancel to close the pop up.
- After saving changes, the pop up closes and the BOE Date configuration page refreshes to display the BOE Date and Time and Result Release Date as configured.