
Assessment
At a glance
Set up and structure the Assessment tab so students can see clear assessment expectations in one place. Understand the Unit assessment approach section, the Assessment structure table's Summary and List views, assessment status indicators, and how to create and order assessment activities.
NoteFrom Semester 2, 2025 you will be able to display activities in both the Assessment tab in the Learning sections using Shadow links. For more information, see Display assessment activities under the learning sections (Shadow links). |
The Assessment tab provides a single place for all key information on assessments in one place. The Unit assessment approach section allows you to feature key unit assessment information, your preferred referencing style, and unit-specific support resources.
The Assessment structure table (Summary view) displays sections drawn from Courseloop, which is also mirrored in your unit’s handbook entry. This provides students with clearer expectations of their learning outcomes and assessments. By default, the Summary view is displayed. Students can freely toggle between the Summary view and the List view.
All assessments should be created directly in the assessment sections under the Assessment tab, which enables them to appear in the Assessment structure table.
If you have assessments which you would like to also be displayed in relevant weekly/ topic sections under the Learning tab that will contribute towards the learning journey task tracker, you can use Shadow links. For more information, see Display assessment activities under the learning sections (Shadow links).
Click the plus icons to learn more about the Assessment tab
-
Unit assessment approach
This section allows you to feature key unit assessment information, your preferred referencing style, and unit-specific support resources. This section sets expectations at a unit level for assessments and clarifies the unit's learning outcomes for students. By default, it appears partially collapsed but can be expanded by selecting View more.
Three pre-populated sections are also included in the Assessment Approach.
- The AI notice section draws on the unit-level AI statement from the Unit settings.
- The Managing Academic Integrity section links to LearnHQ resources.
- University Assessment support features support resources that all Monash students can access.
Assessment structure table
The Assessment structure table (Summary view) displays sections drawn from Courseloop, which is also mirrored in your unit’s handbook entry. These sections display the Assessment Item number, Type, Weighting and Learning Outcomes of the assessment section, as well as any Hurdles.
Note: As these sections are based on information drawn from Courseloop, they cannot be modified (added/reordered) from the Moodle Assessment tab.
Summary view Summary viewBy default, the Summary view of the Assessment structure table is displayed. Students can freely toggle between the summary and list view.
The Assessment summary table will be automatically populated based on activities created in the matching Assessment set up section below. Information displayed include the assessment names, due dates, and submission status of all assessments in the unit. The title of the activity links directly to that activity. This can also include supplementary and non-weighted activities that support assessment.
You can reorder how activities are displayed in each section by changing the order in the Assessment set up sections.
Note: Activities created in the learning sections will not be displayed in the Summary view.
Please note, for an assessment to show up in Summary view it:
- must be created in the Assessment sections.
- must have the Monash Assessment setting: Does this activity contribute to the final grade of the unit? set to YES. For some activities, in addition to selecting this option, you may need to select a Grade type or Rating in order for the activity to appear in the Assessment structure summary table. For more information, see Display supplementary activities in the Assessment structure table.
- cannot be hidden. For restricted assessments, rather than hiding activities, which makes them invisible on the Assessment tab, consider setting an open date for an activity in the activity settings.
List view List view
The List view displays a list of all assessments in the unit (including those created in the learning sections) in chronological order with the assessment name, due dates, and status.
Please note, for an assessment to show up in List view it:
- must have a weighting of more than 0. You can adjust the weighting of an activity in the Moodle Gradebook set up to make it appear/not appear in the assessment summary table. Any non-weighted assessments will still be displayed in the task tracker on the unit dashboard if they have dates attached.
- cannot be hidden. For restricted assessments, rather than hiding activities, which makes them invisible on the Assessment tab, consider setting an open date for an activity in the activity settings.
Assessment status This column displays information to the student about the assessment submission status:- Submitted:The student has made a submission to the activity.
- Due Soon: The student has not yet made a submission to the activity and the due date is approaching.
- Overdue: The student has not yet made a submission to the activity and the due date has passed.
- Date passed: The activity has no submission point (eg. in-class presentations, labs, project presentations, Turnitin draft submission activities, etc.) and the due date has passed.
- Graded: The activity has been graded.
Assessment set up section You can use these sections to create and structure assessments. In addition to assignment activities, you can include file folders, assessment-specific forums, Text and media, and any other Moodle resources you need to scaffold and support your assessments appropriately, including non-weighted activities.Learning outcomes Learning outcomes are automatically imported along with your assessment structure. You can read the full text of the outcome by clicking on the number, either in the structure table or in the assessment sections.
How to set up the assessment tab
ChecklistRefer to the guides below for step-by-step instructions.
|
-
This section allows you to feature key unit assessment information, your preferred referencing style, and unit-specific support resources. It sits at the top of the page, above the Assessment structure table. This section sets expectations at a unit level for assessments and clarifies the unit's learning outcomes for students. By default, it appears partially collapsed but can be expanded.
Watch the video below to learn how to set up the unit assessment approach (1m 20s)
- Navigate to the Assessment tab.
- Ensure you have Editing turned on.
- Click the three dots next to Unit assessment approach and select Edit settings.
- This will bring you to the Assessment approach setup screen, which has three sections.
Expand the accordions below to learn more
-
This field is used to provide an overview of the unit's overall assessment regime. This section has an 800-character limit and is a plain text box. It is intended only to provide a high-level statement on the nature and purpose of assessment across the entire unit. For example, is the scheme of assessment project-based, is it tied to industry practice, or any other key points. Specific details for individual assessments should be included in their respective sections.
Note: When composing your text, keep in mind that text entered in this field will be displayed with the preface: "The assessment of this unit".
For example, the assessment of this unit:
- "is project-based, focusing on collaborative learning and practical outcomes. Assessments follow a scaffolded approach, progressing from foundational tasks to advanced projects. The unit is graded, with marks reflecting performance across tasks. Students must use statistical analysis software to complete data-driven assignments."
- "is research-focused. This unit uses authentic assessments aligned with industry challenges. It is competency-based, requiring students to demonstrate mastery of key professional skills. Attendance at a practical workshop is mandatory for completing key tasks."
Examples of Key Assessment Information
Examples Example sentence General description
Overview of the assessment approach
- project-based
- research-focused
- exam-based
- skill-development focused
- mixed (combination of methods)
is project-based, focusing on collaborative learning and practical outcomes.
Assessment strategy
Describe the overarching philosophy or design.
- scaffolded learning (tasks build on each other)
- authentic assessment (real-world tasks)
- reflective practice (self-evaluation)
- problem-based learning
- formative feedback emphasis (progression-focused)
- summative focus (final outcomes)
Assessments follow a scaffolded approach, building foundational knowledge before advancing to complex tasks.
Grading approach
Clarify whether assessments are competency-based or graded, or a mix of both.
- competency-based (focus on achieving specific outcomes, typically pass/fail)
- graded (range of marks, e.g., HD-D-C-P-F, reflects performance levels)
- mixed approach (combination of competency-based and graded tasks)
This unit is competency-based, requiring students to meet professional standards.
Special Requirements or Conditions
Highlight specific tools, prerequisites, or conditions required for the assessments.
- specific software or tools (e.g., CAD software, statistical software)
- industry-specific standards or frameworks
- location-specific requirements (e.g., on-campus practicals)
- prerequisite knowledge or skills
Students are required to use CAD software and attend an on-campus practical session.
-
Select the referencing style used in your unit from the dropdown list. It will be populated to the Assessment Approach with a direct link to the Libraries Citing and referencing to support your students.
If the referencing style you use is not listed, or different assessments use different referencing styles, please select Individual assignment and include the details in the individual assignment sections.
-
This section allows you to outline support resources offered at the unit, School or Faculty level. These could include course core units, tutoring sessions, Zoom/ office hours, or any other support offered to students below the whole University level.
This is a rich text field, allowing you to add links or other content as appropriate.
- After completing your setup, click Save and display.
-
Watch the video below to learn how to add activities/resources and how to make them display in the Assessment structure table (2m 11s)
- Ensure edit mode is switched on.

- Under the section where you want to add a resource or activity, click +Add an activity or resource.
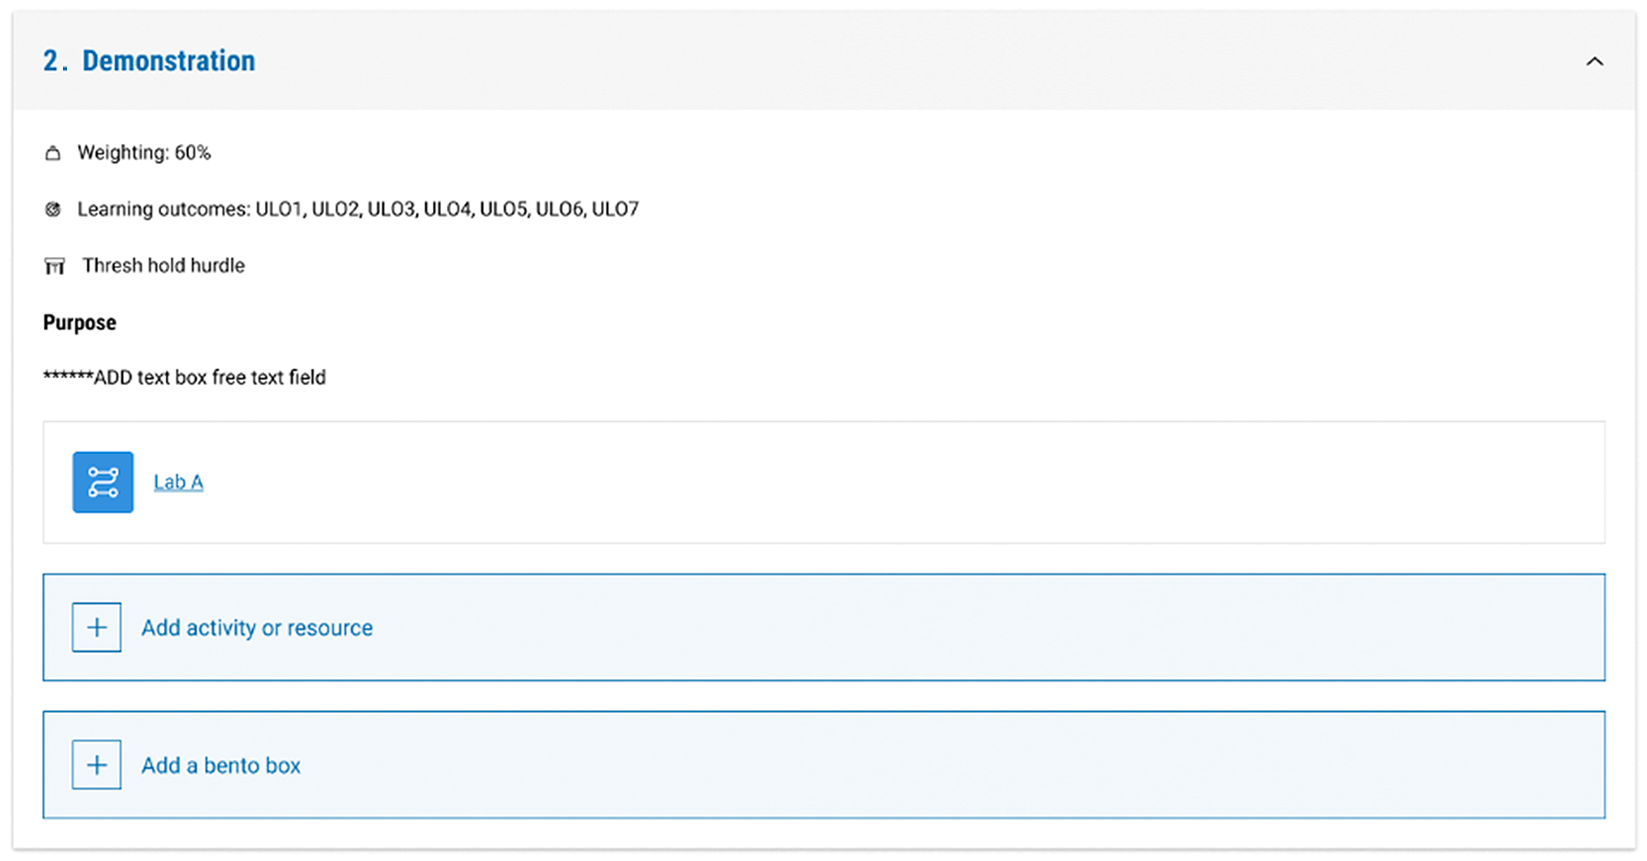
- Click on the desired resource or activity to add it.
- This will open the settings for the item you selected.
- Give the activity or resource a name and description/instructions.
- Configure access dates and times, grouping mode and other settings as required.
- In the Monash Assessment section, select Yes for Does this activity contribute to the final grade of the unit? Selecting this option will allow it to appear in the Assessment structure summary table, even if an item is not graded.
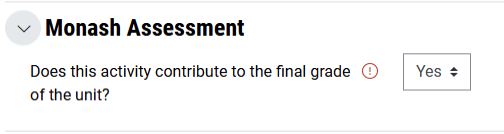
Some activities, you may need to select additional settings in order for the activity to appear. For more information, see Display supplementary activities in the Assessment structure table.
Note: Resources and activities may have different settings depending on the resource or activity, see the specific Resource or activity guide for detailed instructions on how to set up your resource or activity. For more information, see the Activities and resources guide.
- Once the required settings have been configured, scroll to the bottom of the page and click Save and return to unit or Save and display. The activity or resource will now be added to the Assessment set up section and will appear in the Assessment structure summary.
- Ensure edit mode is switched on.
-
- Ensure edit mode is switched on.
- Hover your cursor over the activity or resource. The move icon will appear.
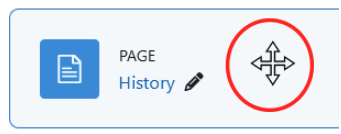
- Click and drag the activity or resource to the appropriate location. You can reorder items or drag them to different sections.
OR
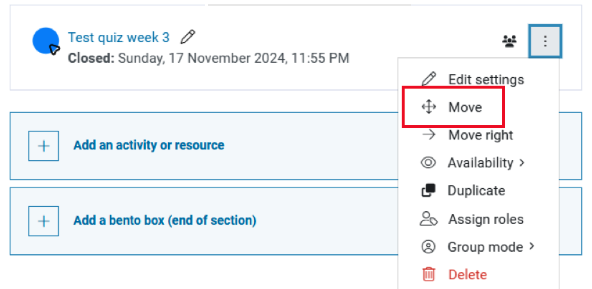
Click the three dots beside the activity or resource you would like to move.
- From the dropdown list, select Move.
- A pop-up window will appear. From the list, select where you would like to move your activity or resource.
- Once selected, your activity or resource will automatically be moved.
Note: You may need to refresh your page before you can see the changes.
- Ensure edit mode is switched on.
-
You can use the Mass actions block to move multiple activities or resources at once.
Add the Mass actions block:
- Switch Edit mode on(Blue) in the top left of the page.
- Expand the left side panel with the arrow and click the Add a Block button.
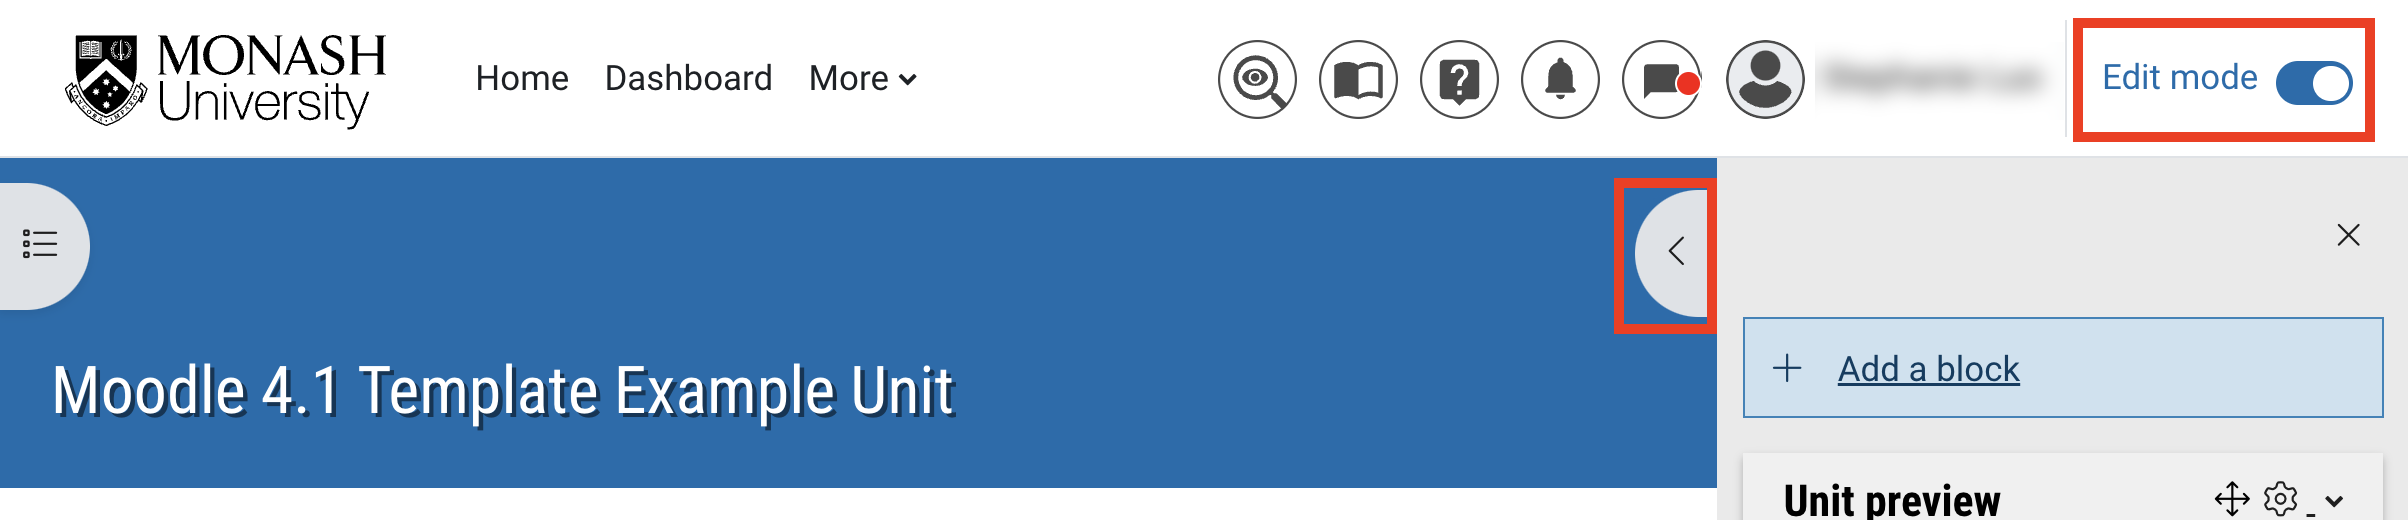
- Select the Mass actions block.
- Once added, you can select multiple items by using the checkboxes beside each resource or activity in the unit.
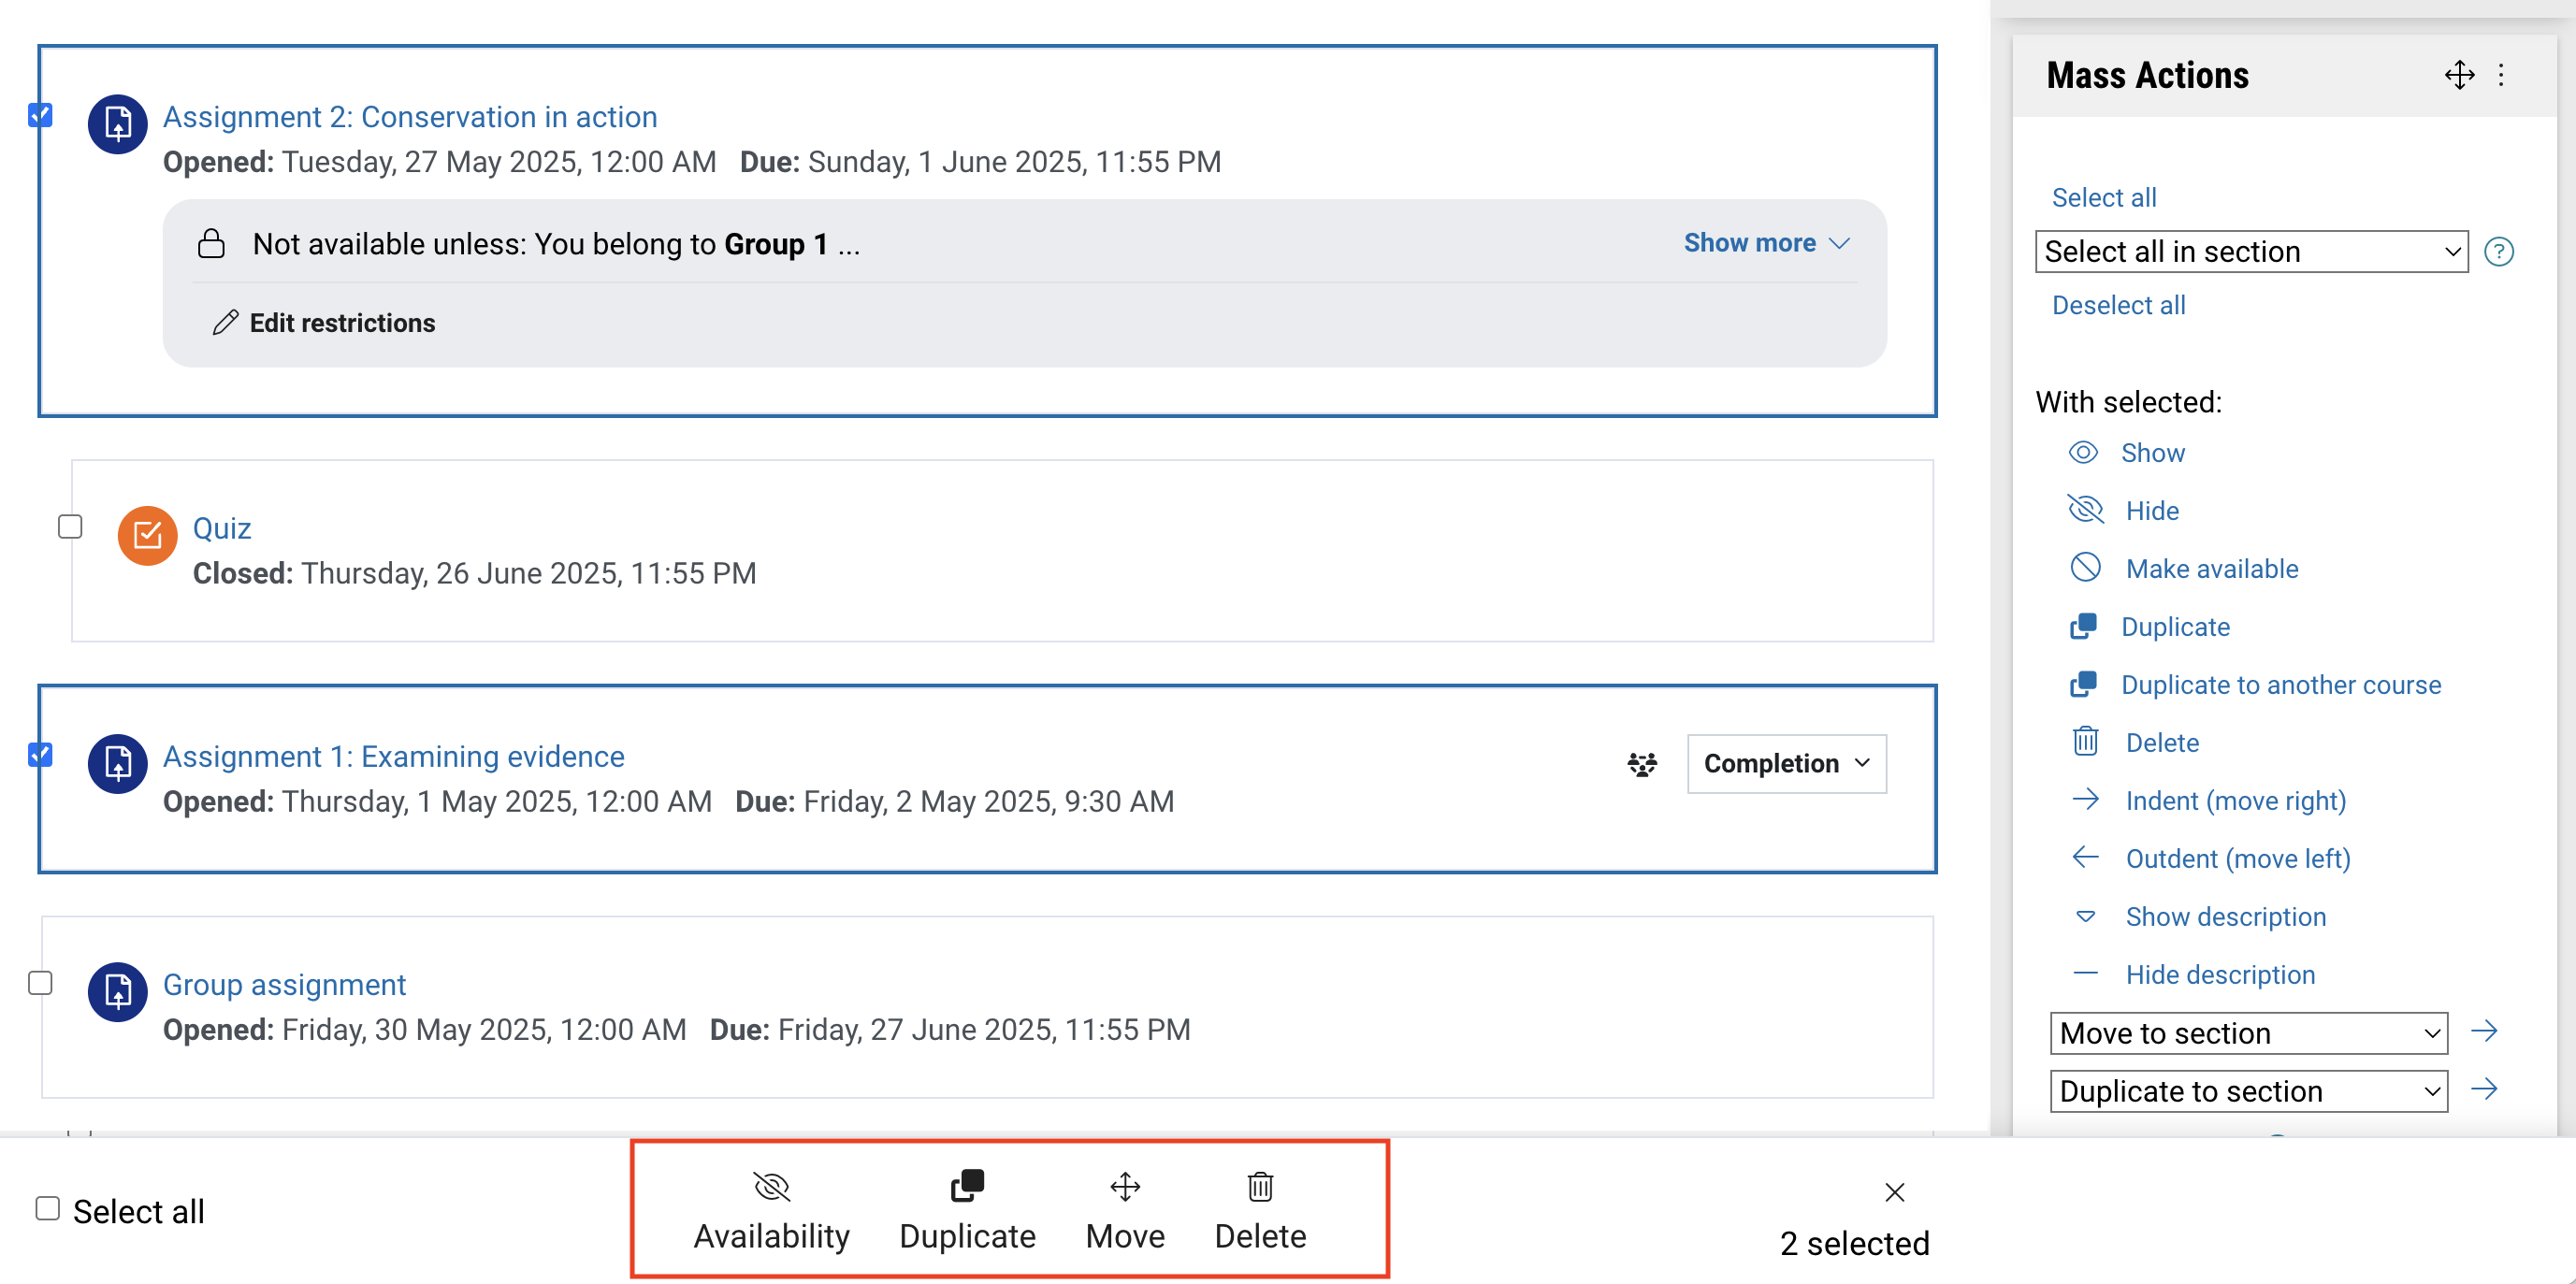
- From the mass action block, with the selected items select Move to section.
- Choose a relevant Assessment set up section from the drop down list, then click the arrow.
- The selected activities will now appear under the chosen assessment set up section and the Assessment structure table.
-
You can use the shadow link activity to create a link to an assessed activity in the appropriate weekly context on the Learning tab (eg. weekly quizzes), while still being displayed in the Assessment tab. Students will see the icon of the original activity type and the original activity name. When students click the shadow link, they will be taken to the original activity.
Watch the video to learn more
Note
Shadow links cannot be created in the Assessment tab. If you intend to use Shadow links to display activities in the Learning tab AND the Assessment Structure table, you MUST create the original assessed activity under the Assessment tab and then add the Shadow link in the Learning section.
Additional notes at end of page.
Please note:
There is currently an issue with Shadow activities and the Mass actions block. If you select a Shadow activity and then use the Footer, the action will be applied to the original activity. This may lead to you moving, hiding or deleting the original. Selecting the Shadow link and using the Side block will result in an error. We strongly advise moving Shadow links using the Move option in the three dot menu.
Add a Shadow link
- Navigate to the activity you wish to create a shadow link for by clicking on the name of the activity. The activity must be created first, before you add a Shadow link.
- Copy the numbers that appear after id= in the URL (web address) for the activity. This is a unique identifier (the Course Module Identifier, or CMID) for the activity.

Note: You can also shadow links for folder resources located on different Moodle pages, however they may appear slightly different in the academic view, with no change to the student view.
- Navigate to where you wish to add your Shadow link.
Note: Shadow links can only be created in the Learning sections.
- Click Add an activity or resource.

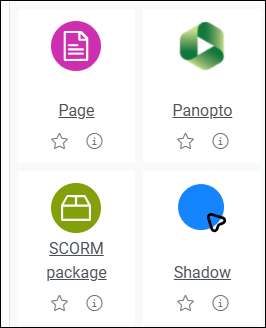
- Select Shadow.
- In the field Target activity's cmid, paste the number you copied.

- Click Save and return to unit.
- Your new activity will have the Shadow link logo, but the name of the original activity. Clicking on the shadow link will take you to the settings of the original activity.
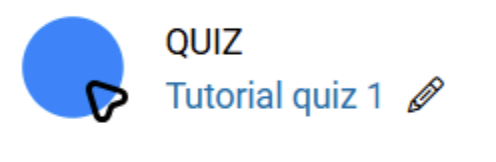
- Students will see the icon of the original activity type and the original activity name. The shadow link also inherits any access restrictions from the original activity. When students click the shadow link, they will be taken to the original activity.
Additional notes
- Shadow links should not be created under the assessment tab: This can lead to errors and unexpected behaviours.
- Shadow link cannot be created for an activity within the same learning section.
- Shadow links can only point to an activity created within the same unit: You can’t create a Shadow link to an activity outside of your Moodle unit.
- Shadow links cannot be created from other shadow links: Shadow links can only be created for actual activities.
- Rolling over activities: When a unit containing a Shadow link is rolled over, the link is updated automatically, and the connection between the two items is maintained.
- Deleting the activity connected to the shadow link: If the original item the Shadow link connects to is deleted, the Shadow link will also be deleted. Deleting the Shadow link has no effect on the original item.
-
Supplementary and non-weighted activities that support assessment can also be displayed in the Assessment summary table.
For most activities, selecting Yes for Does this activity contribute to the final grade of the unit? in the in Monash Assessment activity setting will allow it to appear in the Assessment structure summary table, even if an item is not graded.
For other activities, in addition to selecting this option, you may need to select a Grade type or Rating in order for the activity to appear in the Assessment structure summary table.
Check the table below for the specific display conditions for each activity type
Activity type Grade type: Point/Scale Grade type: None Ratings: None Ratings applied Assignment ✓ ✓ Attendance ✓ ✓ Database ✓ Forum ✓ ✓ Glossary ✓ H5P ✓ Lesson ✓ Open forum ✓ (Rating must also be selected for Grade type) IMS Content package Will not appear in the table Interactive content (H5P) ✓ Quiz ✓ SCORM Package ✓ Wiki Will not appear in the table Workshop ✓ eAssessment Grade Sync ✓ External tools that accept grades
External tool type Grade type: Point/Scale Grade type: None Rating: None Rating applied Cengage ✓ ✓ Ed Discussion (FIT) ✓ ✓ FeedbackFruits 1.3 ✓ ✓ Labster AU ✓ ✓ Macmillan Content tools ✓ ✓ Macmillan LTI tools ✓ ✓ PebblePad LTI 1.3 ✓ ✓ Perusall LTI 1.3 ✓ ✓ SimCapture ✓ ✓ Voicethread (MADA) ✓ ✓ Wiley Assignments ✓ ✓ Wiley Resources ✓ ✓ Items not shown in the table
- Book
- Chat
- Choice
- Echo360
- EQUELLA Resource - MNHS
- openEQUELLAMU Resource
- Engagement analytics
- Feedback
- File
- Folder
- Group self-selection
- Page
- Pearson
- Perusall LTI 1.1
- PollEverywhere
- Reading list (Leganto)
- Questionnaire
- Survey
- SOWISO
- Text and media area
- Turnitin Draft Submission
- URL
- Vital source
- Zoom
-
When a Moodle unit has multiple cohorts attached, the Assessment page dynamically generates assessment sections for each assessment item from CourseLoop in the order courses are listed in the Callista block. For example, if the Callista block is attached to ENG1001 and ENG1002, and both units have 3 assessments, the assessment page will create 6 sections:
- 1-ENG1001
- 2-ENG1001
- 3-ENG1001
- 1-ENG1002
- 2-ENG1002
- 3-ENG1002
Note: The unit codes will only appear when Edit Mode is turned ON and ONLY for Moodle sites with different unit codes associated with it. The unit codes are not visible to students.
There are two approaches for managing assessment sections. Your approach depends on whether the unit codes have completely aligned assessment structures.
Unified assessments Cohort-specific assessments Assessment types Same across all unit codes Different weighting per unit code Weightings Same across all unit codes Different weighting per unit code Learning outcomes Identical Different Hurdles Identical Different Expand the accordions below for the recommended approach
-
If all unit codes share the same assessment regime, you can hide the extra assessment sections, so students view a single set of assessment items. You will still be able to view the hidden sections, but students cannot view or access them.
- Navigate to the Assessment tab in your Moodle unit.
- Click the three dots next to the duplicate sections you want to hide.
- Select Hide Section.
- Use the Unit Assessment Approach to clarify to students that all cohorts will complete the same assessments.
-
If assessment structures differ between unit codes, you can restrict each assessment section based on Callista groups so students only see the assessments relevant to their cohort.
- Navigate to the Assessment Page in your Moodle unit.
- Click on the three dots for the assessment section.
- Select Edit section.
- In Restrict Access, click Add Restriction.
- Select Group, then select the Callista group that corresponds to the unit code for that section.
- Click Save changes.
- Repeat this process for all sections that need to be cohort-specific.
- If necessary, use the Unit Assessment Approach field to share common resources across cohorts.
-
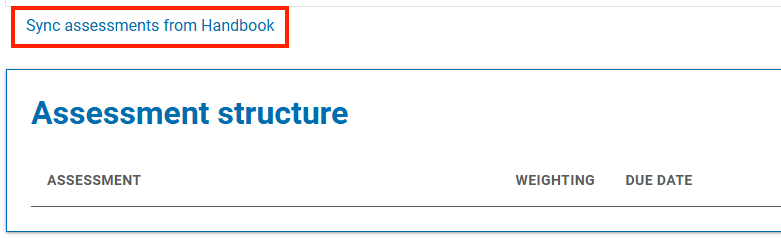
Once the Callista cohort is added, your faculty Moodle administrator can sync your Moodle assessment sections to your Moodle unit's Courseloop/Handbook entry. As these sections are based on information drawn from Courseloop, they cannot be modified (added/reordered) from the Moodle Assessment tab.
Note
Only Monash Moodle administrators can sync the Assessment sections. If any changes to Courseloop/Handbook assessment information occur after the initial sync, notify your faculty Moodle administrator immediately so that they can resync the Moodle assessment sections.
Best practice for common assessment scenarios
View

Best practice for common assessment scenarios
Explore the following best practice solutions for several commonly encountered scenarios when setting up and managing assessments on Moodle.
-
Assessment types where there is a scaffolding resource, such as an online lesson to be completed before it launches into the assessment prep. For exmaple, group work ePortfolio.
Best practice solution
- Ensure each scaffolding resource has completion tracking enabled. For more information, see Track activity completion.
- Use completion tracking to check the activity/resource has been completed.
- In Assessment description let students know that their work will not be assessed until the related activity/resource has been completed - add this reminder in the post class section of the relevant week.
-
Students complete a 100% single project based assessment with multiple milestone points. For example, building a website where the website is worth 100% and handed in at the end of the unit. However the student submits multiple iterations of the website as milestones for feedback throughout the unit.
Best practice solution
- Create a category in gradebook with 0% weightingand give it a name, for example,draft website submissions. For more information, see Set up Moodle Gradebook (Add categories) .
- Create assignments for each milestone and place them inside this category.
- Create the final assignment submission and place it outside of this category.
- Be sure to include that each of the milestones have 0% weight in their title. For example, 'Draft website submission 1 (milestone - 0% of total marks)'.
Note: Due dates will still display on the dashboard for un-weighted activities.
-
Students complete a thesis over two units and only receive a grade when they submit their work at the end of the second unit. The work they submit in the first unit is still valid, and there is still ‘assessment’ content that they need to access but because the Gradebook setup is 0% and they are not awarded a grade/mark, nothing appears in the assessments tab in the first unit.
Best practice solution
Given the specific challenge presented in this scenario, it is advised that you use the Project template and hide the Assessment section. Assessment items can still be created as usual in the Learning sections. They will still be visible in the Learning sections and Unit Dashboard.
Please note: Use of the Project template will result in assessments not being automatically populated to the Schedule tab
-
Key assessment information such as learning outcomes and weightings are displayed on the Assessment Summary table at the level of handbook assessments, but not at the level of individual assessment items. If you want to show these details for individual assessment items, follow these steps.
Best practice solution
- Ensure that all essential assessment information is entered into the assessment into the Assessment description or the related Activity instructions.
- Include your learning outcomes at the beginning of the assessment description.
- Put the weighting for each assessment in the assessment title, or in the description. For example, Assessment 1 (15% of total marks).
-
When a Moodle unit has multiple cohorts attached, the Assessment page dynamically generates assessment sections for each assessment item from CourseLoop in the order courses are listed in the Callista block. Depending on if multiple cohorts have the same or different assessment regimes, there are different approaches for managing the assessment sections.
For more information, see Manage Assessment sections for multi-cohort units.
-
Oral presentations and other forms of individual assessment often take place over a period of one or two weeks, where individuals or groups are asked to present at random or with little notice. As such, the individual presentations have no fixed due date.
Best practice solution
Please note: The following solution may cause additional challenges in regards to individual extension dates.
- Set the Allow submissions from date to the first date the activity will be run. For example, Week 9 of your unit.
- Set the due date for the activity be set the to the last date the activity will be run. For example, Week 10.
- Let your students know that the assessment will be conducted during the Week 9-10 tutorials - do this in the Assessment description.
-
The activity/assessment needs to have separate due dates for each student/group without being replicated/multiple versions displayed in the assessment section.
Best practice solution
- Use the group override feature and set a separate due date for each group. For more information, see Set up extensions and resubmissions (group overrides).
-
The unit requires the creation of a supplementary assessment that only appears on the Assessment summary table of students who are eligible. For more information, see Supplementary assessment.
Best practice solution
- Create a group specifically for the students undertaking the Supplementary assessment. You will need to create one group for each supplementary assessment. For more information, see Create groups and groupings.
- Create an Assignment activity and include “Supp” or “Supplementary” in the assessment name. This helps the spec con team clearly identify that the assessment is not eligible for special consideration.
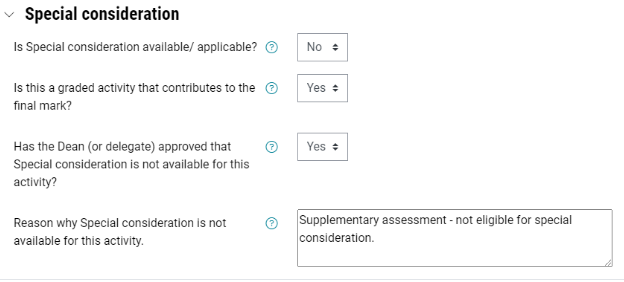
- In the Special Consideration settings for the assessment, specify the following:
- No - Is Special consideration available/applicable?
- Yes - Is this a graded activity that contributes to the final mark?
- Yes - Has the Dean (or delegate) approved that Special consideration is not available for this activity?
- In the Reason why Special consideration is not available for this activity comment box, specify the following: "Supplementary assessment - not eligible for Special consideration”.
- Restrict this assessment to only those in the group undertaking the supplementary assessment. For more information, see Restrict access to a resource or activity: Conditional restrictions.
- Provide the relevant information around the supplementary assessment (including a link in the supplementary assessment information page) in the Unit information section.