Set up a SmartEvidence framework
SmartEvidence allows you to add a framework to an ePortfolio collection that can be used to assess the collection against a range of predefined competencies that students are expected to demonstrate. The Framework includes a high-level description of its purpose and design. Each competency element has a description field to ensure all users understand what the element addresses. Elements can have a hierarchy, where some elements are subordinate to other elements. Elements may allow self-assessment, where a student indicates their own competency, or they may require teacher assessment before being deemed competent. Teaching roles are assigned at this time.
NoteCreating a SmartEvidence framework can only be done by Administrators. If you believe your course needs a SmartEvidence framework set up, please contact your Faculty support staff. Once the framework has been set up, you can can create a SmartEvidence collection to share with students. |
Set up a SmartEvidence framework template
When creating a Collection in the ePortfolio, you can choose to associate the collection with a SmartEvidence framework. Most of the time you will set this up for students, but students can select this when they create a Collection.
Watch the video below to learn more (4 min 22 seconds)
- On the Portfolios page, click the Add button. In the modal that comes up, click Collection.
Note: You must have created at least one page to create a collection. For more information see Create page.
- Fill out the standard settings (Name, description, tags, etc.) as required.
- From the SmartEvidence framework dropdown, select the framework you require for the collection.

- Click the Next: Edit collection pages button. Select which pages will be included in the collection.
- Click Continue: Share.
- In the sharing settings, expand the Advanced Sharing settings, ensure you set Allow Copying to Yes.
- Use the Shared with drop down to specify who you would like to share the template with. For detailed instructions, see Share template.
- Once finished, click Save.
- The SmartEvidence framework will automatically be added as the first page of collection. The SmartEvidence map displays the elements as rows and individual pages of the collection as columns.
- Once shared with students, they will be able to begin adding annotations for each SmartEvidence standard. For more information about how students add annotations, see LearnHQ: Using a SmartEvidence framework.
Click on the plus icons to learn more about different statuses
Adding feedback and marking student annotations
Once students have added annotations to their SmartEvidence map, you can place feedback and assess if students’ work meets the standards. Other users, such as students and external guests, can also place feedback on annotations if they have the correct permissions. You can
You can add feedback to the students annotation in two ways:
- Click on the circle for the annotation on the SmartEvidence map.
OR
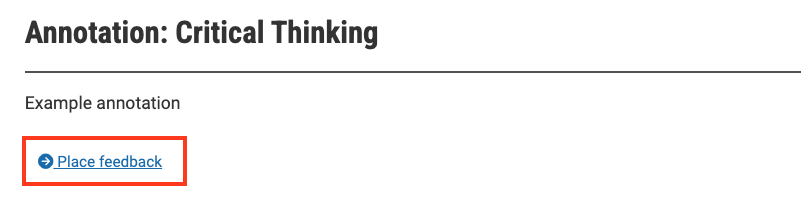
View the Annotation on the portfolio page and select Place Feedback.
- If you have permission to mark student annotations, you will see the Assessment dropdown list. If you do not have permission, you can still add a text comment, but not assess the criterion.
- Based on your assessment of the student’s portfolio and annotated evidence, from the dropdown list select the relevant option.
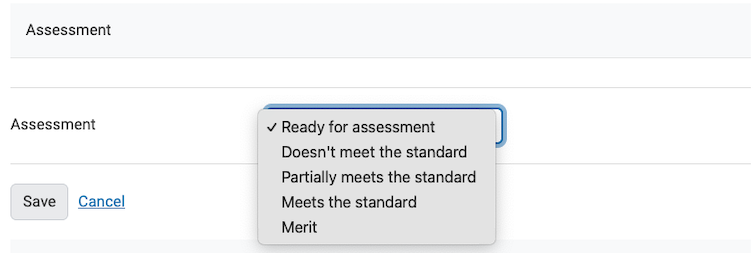
Note: These options may vary depending on the setup of the SmartEvidence framework.
- In the Place feedback text box, add your feedback. Be sure to explain how the student’s annotation addressed, or failed to address the criteria and how the student could further demonstrate how they have meet the standard.
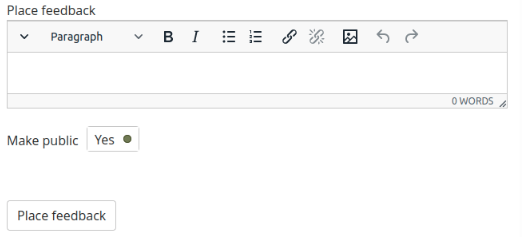
- Choose if your feedback with be public:
- Yes: Anyone with access to the page can see the feedback.
- No: Only the author of the portfolio will see the feedback.
- Click Save.
- Click Place feedback.