Set up a scheduled Zoom meeting
This guide will cover the steps to schedule a Zoom meeting at a specified time. There are many ways to set up a scheduled Zoom meeting, for example via the app, via the Monash Zoom website, via Google Calendar Zoom plugin or via the Moodle integration. Click through the tabs below to view the different ways you can set up a scheduled Zoom meeting.
Launch the Zoom application. If you have not installed the Zoom desktop app, we recommended that you download the app from the official Zoom website.

- Click Schedule.
- Give your meeting a name in the Topic field.
- Set a time for the start of your meeting and the duration. The date format is MM/DD/YYYY.
- Check that the timezone is correct.
NOTE: Invitations to Zoom meetings are listed by the local time zone that they were created in. Keep this in mind when scheduling a meeting and when communicating the meeting time and timezone to participants. Students overseas may have difficulty attending due to time differences. (China is 3 hours behind AEDT)
- If the Zoom meeting will be recurring, you can select the Recurring meeting checkbox. You will need to set up the recurrence settings in the calendar event once the Zoom meeting has been scheduled.
- Choose whether your video will be switched on at the start of the meeting. It is recommended that you turn video off for Participants. Both can still choose to join with video once the meeting has commenced.
- Choose whether participants can join via Telephone, Computer Audio or Both. Joining via telephone is a useful option where internet connectivity may be unreliable. Participants can dial a dedicated number in their country (often toll-free) to join the meeting. A full list of Zoom International Dial-in Numbers can be found here.
- In the Options, click Advanced Options to view and enable a number of Advanced options. The recommended settings for Zoom meetings such as:
- DO Enable join before host
- DO Mute participants upon entry: This is recommended for large groups, or where you would like to control when group discussion occurs.
- DO NOT Use Personal Meeting ID: Your personal meeting ID is like your personal online 'meeting room'. You can use this for regular meetings with the same cohort of participants.
- DO Record the meeting automatically: All Zoom virtual classroom sessions should be recorded and shared with students in Moodle afterwards. Choose Record to the cloud as this gives you access to additional functionality including closed captions and transcriptions.
- In Alternative Hosts, you can type in the email of the person you would like to add as an alternative host. You can add multiple emails separated by commas. For example, you might want to add tutors or teaching assistants as alternative hosts, who can run the Zoom meeting without requiring the meeting creator to be in attendance.

Note: If the alternative host joins the meeting before the host, they will automatically become the host. If the creator of the meeting joins first, the alternate host will default to the co-host role, which shares most of the controls as the host. This allows a co-host to manage the administrative side of the meeting, such as managing the chat.
- When finished, click Save.
- Your meeting settings will be saved. You can edit settings, delete or start the meeting instantly from the Meetings tab or from the Meetings page on the Zoom website (https://zoom.us/meeting).

Sharing the meeting link with students
Zoom automatically creates a calendar event for your Zoom meeting. However, if you are using Zoom in your teaching, it is STRONGLY RECOMMENDED that you communicate the meeting details clearly in your Moodle unit as well. You can post the meeting link or URL in the announcements forum or where the link will be clearly visible to students.
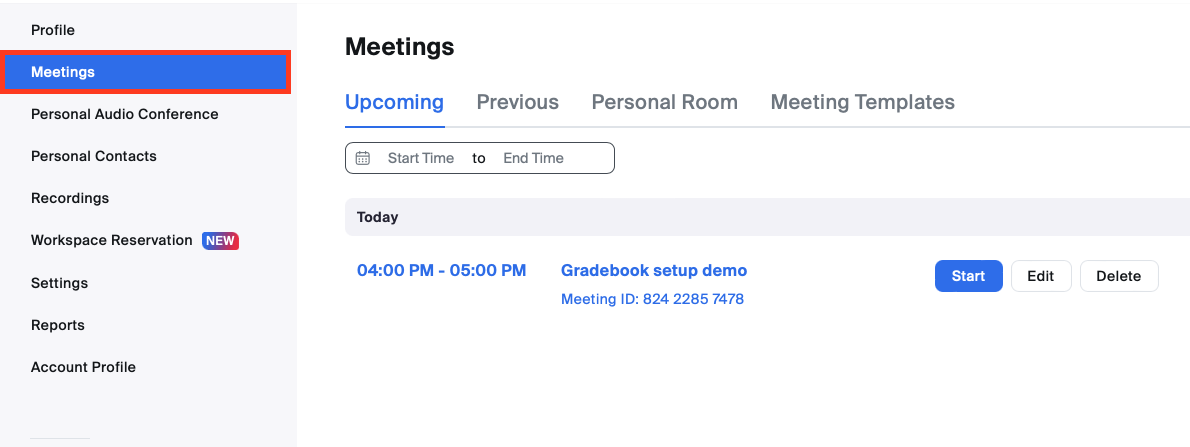
- Launch the Zoom application.
- Click the Meetings tab. In the Meetings tab, you will see a list of your scheduled upcoming meetings on the left hand column.
- Select the Zoom meeting you would like to share.
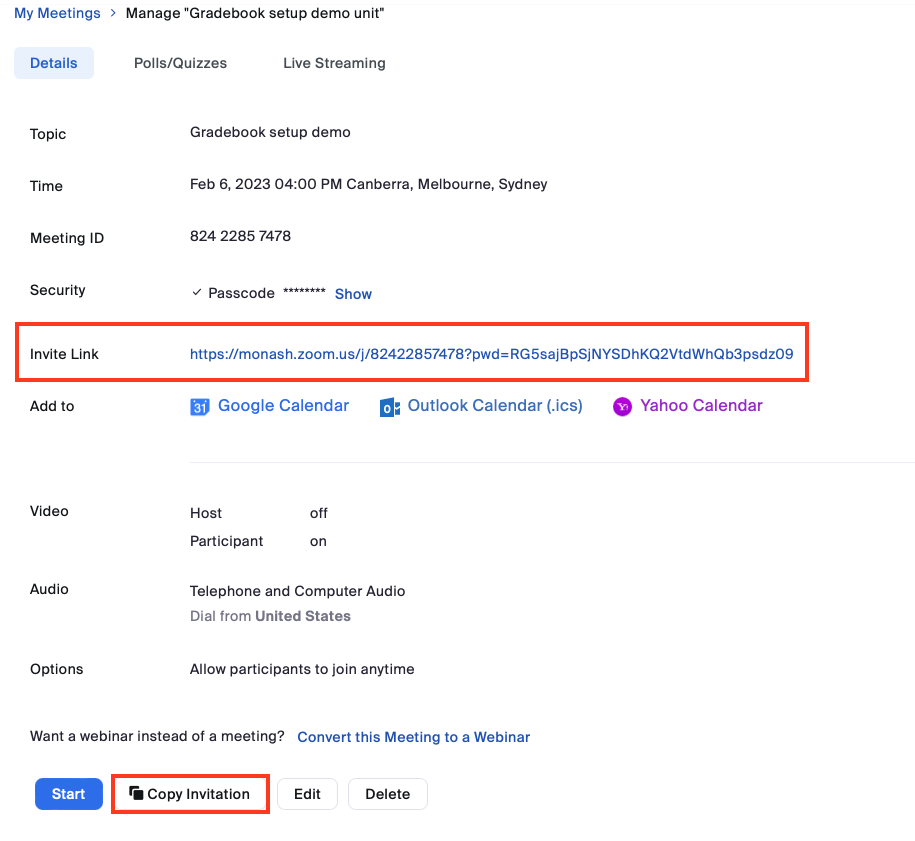
- Click Copy Invitation. You can click Show Meeting Invitation to preview the meeting invitation text.

- Navigate to where you would like to post the link on Moodle.
- Make sure you have editing turned on, and in any text editor, paste the Meeting Invitation and click Save and display.
- You may want to edit the text of the invitation for brevity, but make sure the below information is kept.
Time: DD/MM/YYYY, 24:00 Timezone
Join from a PC, Mac, iPad, iPhone or Android device:
Please click this URL to start or join. https://monash.zoom.us/j/#########
Or, go to https://monash.zoom.us/join and enter meeting ID: ### ### ###
NOTE: The meeting links in your copied meeting invitation will not paste as hyperlinks. If you would like to turn them into clickable hyperlinks, you can do this with the hyperlink button in your text editor. For more information, see the text editor guide.
Log into the Zoom website (https://monash.zoom.us/meeting) and navigate to the Meetings page by clicking Meetings on the left hand side menu.

- Click Schedule a new meeting.
- Give your meeting a name in the Topic field.
- Set a time for the start of your meeting and the duration. The date format is MM/DD/YYYY.
- Check that the timezone is correct.
NOTE: Invitations to Zoom meetings are listed by the local time zone that they were created in. Keep this in mind when scheduling a meeting and when communicating the meeting time and timezone to participants. Students overseas may have difficulty attending due to time differences. (China is 3 hours behind AEDT)
- If the Zoom meeting will be recurring, you can select the Recurring meeting checkbox. You will need to set up the recurrence settings in the calendar event once the Zoom meeting has been scheduled.
- Choose whether your video will be switched on at the start of the meeting. It is recommended that you turn video off for Participants. Both can still choose to join with video once the meeting has commenced.
- Choose whether participants can join via Telephone, Computer Audio or Both. Joining via telephone is a useful option where internet connectivity may be unreliable. Participants can dial a dedicated number in their country (often toll-free) to join the meeting. A full list of Zoom International Dial-in Numbers can be found here.
- In the Options, click Advanced Options to view and enable a number of Advanced options. The recommended settings for Zoom meetings such as:
- DO Enable join before host
- DO Mute participants upon entry: This is recommended for large groups, or where you would like to control when group discussion occurs.
- DO NOT Use Personal Meeting ID: Your personal meeting ID is like your personal online 'meeting room'. You can use this for regular meetings with the same cohort of participants.
- DO Record the meeting automatically: All Zoom virtual classroom sessions should be recorded and shared with students in Moodle afterwards. Choose Record to the cloud as this gives you access to additional functionality including closed captions and transcriptions.
- In Alternative Hosts, you can type in the email of the person you would like to add as an alternative host. You can add multiple emails separated by commas. For example, you might want to add tutors or teaching assistants as alternative hosts, who can run the Zoom meeting without requiring the meeting creator to be in attendance.
Note: If the alternative host joins the meeting before the host, they will automatically become the host. If the creator of the meeting joins first, the alternate host will default to the co-host role, which shares most of the controls as the host. This allows a co-host to manage the administrative side of the meeting, such as managing the chat.
- When finished, click Save.
- Your meeting settings will be saved. You can edit settings, delete or start the meetings from the Meetings page on the Zoom website (https://zoom.us/meeting).
Sharing the meeting link with students
Zoom automatically creates a calendar event for your Zoom meeting. However, if you are using Zoom in your teaching, it is STRONGLY RECOMMENDED that you communicate the meeting details clearly in your Moodle unit as well. You can post the meeting link or URL in the announcements forum or where the link will be clearly visible to students.
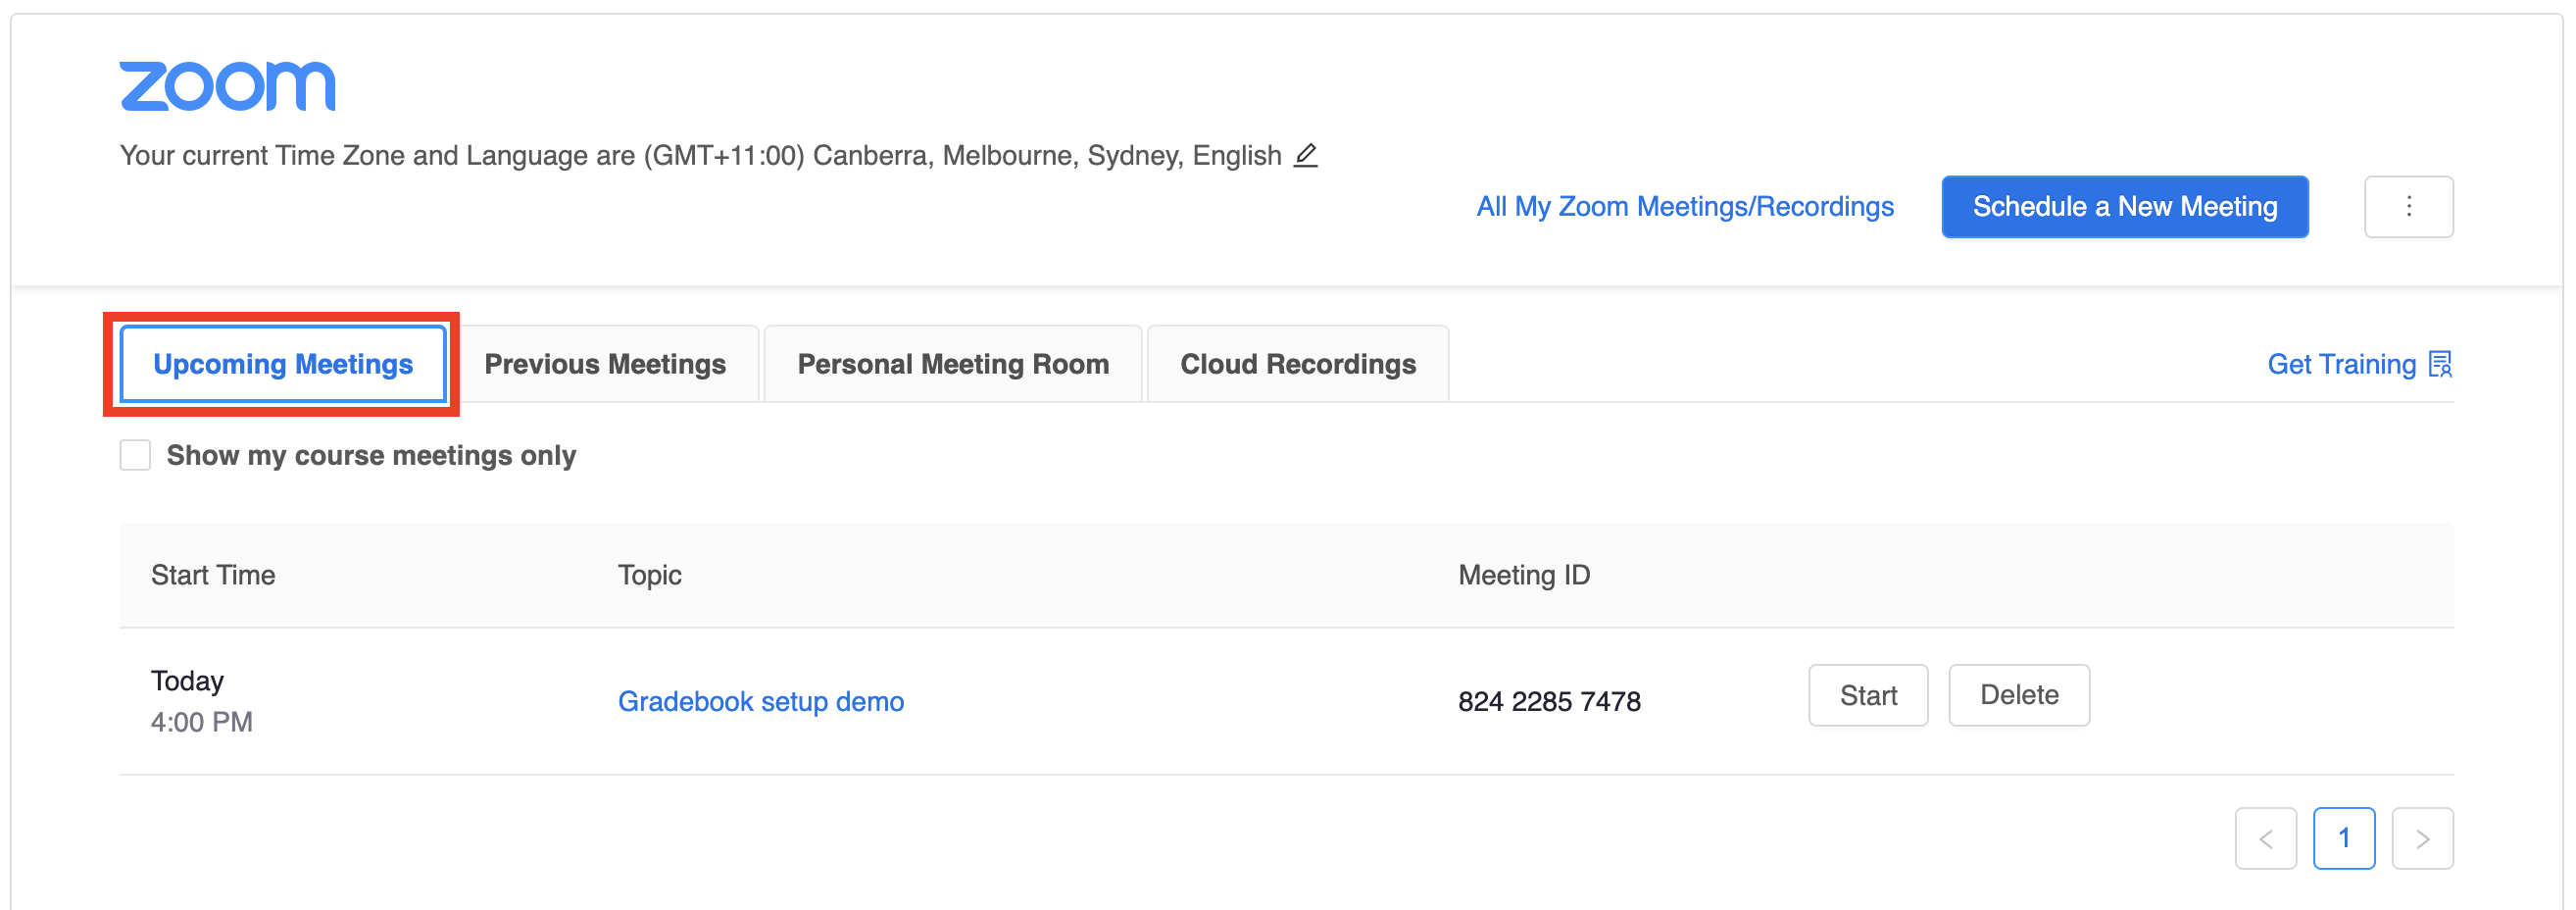
- Navigate to the Meetings page on the Zoom website. From the Meetings page, you will see a list of your scheduled upcoming meetings.
- Select the Zoom meeting you would like to share.
- Copy the Invite link or click Copy Invitation.
- Navigate to where you would like to post the link on Moodle.
- Make sure you have editing turned on, and in any text editor, paste the Meeting Invitation and click Save and display.
- You may want to edit the text of the invitation for brevity, but make sure the below information is kept.
Time: DD/MM/YYYY, 24:00 Timezone
Join from a PC, Mac, iPad, iPhone or Android device:
Please click this URL to start or join. https://monash.zoom.us/j/#########
Or, go to https://monash.zoom.us/join and enter meeting ID: ### ### ###
NOTE: The meeting links in your copied meeting invitation will not paste as hyperlinks. If you would like to turn them into clickable hyperlinks, you can do this with the hyperlink button in your text editor. For more information, see the text editor guide.
If you have added the Zoom integration plugin in Moodle, you can schedule Zoom meetings from your Moodle unit which students can also access via Moodle. Zoom meetings scheduled via the Zoom integration and recorded to the cloud will now automatically be uploaded to your Moodle unit's Panopto folder. For more information, see Zoom integration in Moodle.
You can also Import meetings by clicking the three dots icon. You will need to do this to use some advanced features such as pre-assigned breakout rooms. Enter the Meeting ID of a meeting you have previously created through the interface at monash.zoom.us

- Click Schedule a new meeting.
- Give your meeting a name in the Topic field.
- Set a time for the start of your meeting and the duration. The date format is MM/DD/YYYY.
- Check that the timezone is correct.
NOTE: Invitations to Zoom meetings are listed by the local time zone that they were created in. Keep this in mind when scheduling a meeting and when communicating the meeting time and timezone to participants. Students overseas may have difficulty attending due to time differences. (China is 3 hours behind AEDT)
- If the Zoom meeting will be recurring, you can select the Recurring meeting checkbox. You will need to set up the recurrence settings in the calendar event once the Zoom meeting has been scheduled.
- Choose whether your video will be switched on at the start of the meeting. It is recommended that you turn video off for Participants. Both can still choose to join with video once the meeting has commenced.
- Choose whether participants can join via Telephone, Computer Audio or Both. Joining via telephone is a useful option where internet connectivity may be unreliable. Participants can dial a dedicated number in their country (often toll-free) to join the meeting. A full list of Zoom International Dial-in Numbers can be found here.
- In the Options, click Advanced Options to view and enable a number of Advanced options. The recommended settings for Zoom meetings such as:
- DO Enable join before host
- DO Mute participants upon entry: This is recommended for large groups, or where you would like to control when group discussion occurs.
- DO NOT Use Personal Meeting ID: Your personal meeting ID is like your personal online 'meeting room'. You can use this for regular meetings with the same cohort of participants.
- DO Record the meeting automatically: All Zoom virtual classroom sessions should be recorded and shared with students in Moodle afterwards. Choose Record to the cloud as this gives you access to additional functionality including closed captions and transcriptions.
- In Alternative Hosts, you can type in the email of the person you would like to add as an alternative host. You can add multiple emails separated by commas. For example, you might want to add tutors or teaching assistants as alternative hosts, who can run the Zoom meeting without requiring the meeting creator to be in attendance.
Note: If the alternative host joins the meeting before the host, they will automatically become the host. If the creator of the meeting joins first, the alternate host will default to the co-host role, which shares most of the controls as the host. This allows a co-host to manage the administrative side of the meeting, such as managing the chat.
- When finished, click Save.
- Your meeting settings will be saved. You can edit settings, delete or start the meeting instantly from the Upcoming Meetings tab.
Sharing the meeting link with students
Students can access Zoom meetings directly from the Zoom Moodle integration. However, because Zoom meetings created or listed in the integration will be visible to ALL members of the unit, ensure the names of your Zoom meetings will be clear to your students. It is also STRONGLY RECOMMENDED that you communicate the meeting details clearly in your Moodle unit as well. You can post the meeting link or URL in the announcements forum or where the link will be clearly visible to students.