Lessons (Moodle activity)

The Moodle Lesson activity presents content and questions that each student navigates through individually according to their responses to the questions or choices posed. It works on a similar concept to the popular “Gamebook” or “Choose Your Own Adventure” style of book. Moodle Lessons adds an interactive element to the content, thus allowing the student to be actively engaged with the material and improving learning outcomes. Creating a Moodle Lesson requires preparation and organisation of your material for the successful inclusion of Moodle Lessons. Based on how the content is to be used and/or assessed you may want to create a Simple lesson or an Advanced lesson. Consider:

  • Is it a stand-alone learning module with immediate assessment tasks?
  • Is it a supplementary module designed to consolidate student learning of a specific topic?
  • Is it a graded, linear learning experience or an ungraded, non-linear practice session?
  • Can students go back and revisit areas or is it just a once-only opportunity?

Create a Lesson

  1. In the top right hand corner of the page, switch Edit mode to ON(Blue).
  2. In the section where you would like to add a resource or activity, click +Add an activity or resource.

    Note: You can add new resources or activities above or below any existing activities or resources.

  1. Select Lesson.
  2. In the General section give your lesson a name and a description (this will display as the link on the unit page).
  3. Additional settings can also be set now, or later as required. These must be set for each lesson.
    • Appearance: Set a progress bar, displaying a menu, ongoing score and a range of options for the “look-and-feel” of your lesson
    • Availability: Set release and end dates, a time limit and set a password
    • Flow control: Set the options for student interaction throughout the lesson
    • Grade: Set your assessment options
    • Common module settings: Set availability and groups
    • Restrict access: Set restrictions as required
    • Activity completion: Set completion tracking and expected date
    • Tags: Add any tags you want here

    Note: Throughout this and other topics you will be given the option to 'Expand/Collapse' or show ‘More/Less'.  These options show or hide information according to your options requirements

Lesson pages

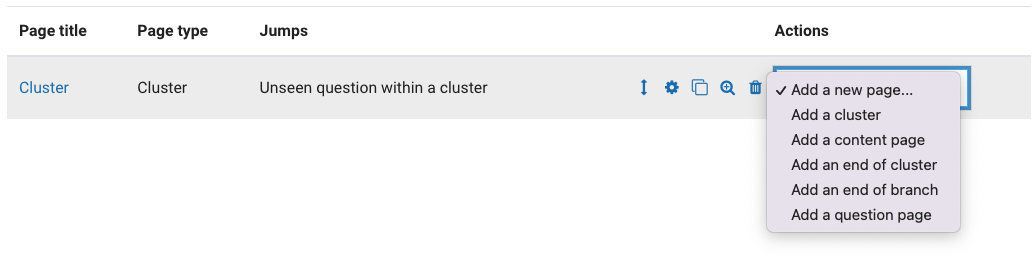
  1. Navigate to the lesson you want to edit.
  2. From the Lesson tab, you can choose what you would like to do first.

    Editing Lesson - what would you like to do first? Import questions. Add a cluster. Add a content page. Add a question page

NOTE: Once you have added at least one content page, you will be able to preview your lesson in the Lesson tab.

Edit a lesson page

  1. Click on Edit lesson.
  2. For the lesson page you would like to edit, you can:
    • Edit the lesson page. Click on the settings cog icon, make the changes as needed and then click Save page.
    • Delete a lesson page. Click on the deleteicon and click Continue.
    • Move a lesson page. Click on the arrow icon. Move page to here links will appear between each existing lesson page. Click on the link where you would like to move your page to.

Ending your lesson

  1. Click on Edit lesson.
  2. Navigate to the last page of your lesson. Click on the cog icon.
  3. In the Content Description textbox, enter a description, which will inform the student of the end of the lesson.
  4. In the Jump field, use the drop down menu and select End of lesson.

    Note: The text from the Content Description text box will form into a label for a button. The button acts as a guide to what's on the next page after you click it.

  5. Click Save page.

Other lesson actions